Welcome to Crossing Creeks RV Resort & Spa in the heart of iconic Blairsville

RV Tech (35)

Older RVs and tow vehicles may lack some of the newest electronic accessories, including one of the more useful innovations, the backup camera. With wireless technology, it’s actually quite easy to add one.
The rear of a travel trailer is a great spot for a backup camera, but it’s a place not likely to have one. A backup camera will make backing into a campsite and just turning around much easier. It also will make highway driving easier because it can serve as a rearview mirror, displaying what’s behind your trailer.
A wireless setup is ideal for the rear of a trailer—the camera and sending unit behind the trailer, and the viewer inside the tow vehicle. You also can get wireless systems that add cameras to the blind spots of trailers or motorhomes. Wireless range may be as high as 70 feet.
Wired cameras for trailers with up to 50 feet of wire are available, but you must decide if you want to do an installation on that scale. Remember, you would have to wire the length of the trailer and the length of the tow vehicle, plus connect at the hitch.
A wired camera is better used on a motorhome or for mounting a camera to work only for a tow vehicle. Wired units generally are cheaper but take more time to install. A camera on the tow vehicle itself will help when driving the truck alone, and maybe during trailer hitching, but it won’t help you see behind the trailer.
Costs Range Widely
You can get a camera for less than $20, but you’ll probably have to supply a monitor, and the image quality will be low, especially in extreme lighting conditions. Kits with both camera and monitor range from about $60 to the mid-$200 area for wired types, and from about $100 to $400 for wireless, with the monitor size and features affecting the price. Wireless systems with extra cameras for blind spots, useful on large motorhomes and trailers, are available for about $500 but can top $900.
Available Features
Mounting Method - Cameras can be mounted by drilling through your vehicle’s or trailer’s body, by using pressure-sensitive tape, or by mounting atop or in place of the license plate frame.
Display Type - You can buy separate camera and monitor, camera-and-monitor kits, or cameras that beam their signal to your iOS or Android smartphone. Displays typically increase with screen size, 4.3-, 5- or 7-inch. Some displays replace your rearview mirror, with widths between 7 and 10 inches. They work like traditional mirrors when not powered up.
Sensor Type - CMOS sensors provide a lower-quality image, but they’re cheaper. CCD sensors provide good images even in low or bright light, but they cost more.
Reverse Image - The view looks like what you see in your rearview mirror—highly desirable.
Auxiliary Lights - Some cameras get help at night from small lights. Infrareds are best.
Lane Departure Warning - Another feature not available on earlier model vehicles, lane departure alerts you if you stray into another lane.
Recording and Playback - Look for this if you want a record of your driving.
Backup Grid - Lines guide you in backing up straight. Original equipment cameras typically have this feature.
Instant Power - As on new vehicles, the camera goes on as soon as you shift into reverse.
DIY or Installed?
Experienced do-it-yourselfers can probably handle installation, but bigger wired systems may be better left in the hands of a shop. You may balk if your camera requires drilling; make sure it properly seals out water to prevent rust, and use a quality drill bit from a name brand, such as Black & Decker, Dewalt or Milwaukee. You may have to splice into your vehicle’s wiring with some systems, and definitely for automatic power-on, so make sure you’re comfortable with that. Expect to pay a shop’s normal hourly rates for installation.
We all love the latest gadgets, and more importantly, what they can do for us. Few of us want to live without cell phones, GPS-based directions or rechargeable devices.
There are, however, a few examples of old technology that remain useful in an RV.
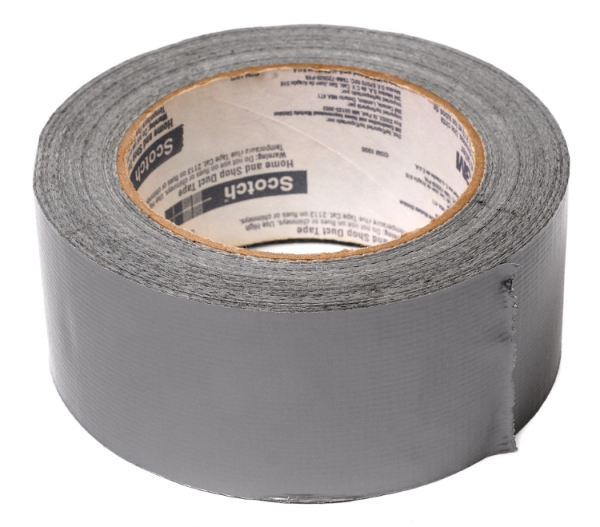
Duct Tape
Now, some of you may think of duct tape as the greatest invention of all time. That’s probably the wheel, but the silvery adhesive aid is one simple, inexpensive, versatile invention. It’s great to have a roll on hand.
And why not? In World War II, this water-resistant, strong tape was used to keep ammo dry by sealing ammunition boxes. When the Apollo XIII moon mission was crippled by an explosion, it sealed up the makeshift oxygen system that astronauts cobbled together and helped to save their lives. Anything that helped win the world’s biggest war and bring three endangered astronauts back from the dark side of moon has merit.
You’ll appreciate duct tape if a piece of trim comes loose and you want to keep it from flapping as you drive. And you’ll thank the stars that you have a roll if a fender bender has your bumper cover dragging. (People have held bumper covers up for months with duct tape.) It will also at least slow a hose leak.
You also may want to buy a role of quality gaffer’s tape, which is used on movie sets. It’s cloth-backed but unlike duct tape has no plastic backing for water resistance. Gaffer’s tape, which delivers a strong bond, leaves no or reduced residue, making it great for interior use.
Bungee Cords
Like duct tape, bungee cords are great in a pinch. The elastic cords, with metal or plastic hooks on the ends, come in different thicknesses and lengths.
A carefully installed bungee cord also will hold up that bumper cover. It will keep cabinet doors closed when a latch beaks. A bungee cord will secure bikes to a rack and stop that annoying rattle from a loose item in your storage area. We personally know of a case where a tiny bungee held a loose cover to the master cylinder of a poorly maintained rental truck for the length of an interstate move. Buy multiple sizes so you’ll find a cord for whatever pops up, so to speak.
CB Radio
The days of relying on a CB radio for directions, traffic conditions and plain old chatter are long gone.
But CB radios—that’s Citizens Band, for the uninitiated—can be a useful emergency tool. Most police no longer monitor CB transmissions for emergency calls, but those that do still listen to Channel 9 are probably in remote rural areas. If you’re trying to deal with a flat tire where there’s no cell tower, a CB radio may do the trick.
Paper Map
Electronics rule where road maps once were king. But the accordion-fold paper map, spread out across your table at the local diner, or a good road atlas will give you the big picture one heck of a lot better than your tiny cell phone screen will. And where there are sporadic or no cell phone signals, a paper map is all you’ve got. It’s cheap and takes little space. Keep one handy.
Alkaline Batteries
Throw-away batteries are passé, but in an emergency, they can be a godsend. For one thing, they’ll last longer than the power in a rechargeable flashlight. If a mechanical issue prevents recharging, a flashlight with a couple of long-lasting alkalines will keep you going—just like that bunny on TV.
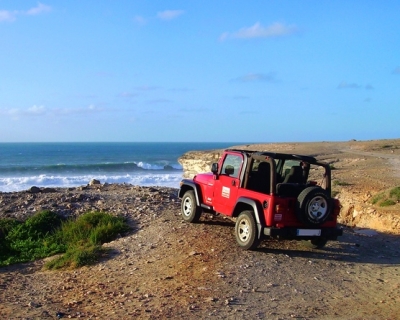
Having a vehicle smaller than your motorhome at the ready when you’re set up at a campsite is a major convenience. It’s easier to drive a smaller vehicle to get groceries, visit a friend, see a movie or venture off road.
If you camp in a fifth wheel or trailer, secondary transportation isn’t an issue. You just drive the unhitched tow vehicle.
For RVers driving a motorhome, it’s a different story. Unless the motorhome is a toy hauler, you have to tow a vehicle. Dollies and trailers can be difficult to maneuver, and trailers add weight—and work. That makes flat towing—also called four-down or dinghy towing—the best solution.
Finding a vehicle that won’t be damaged by rolling along on all four wheels takes work. Only some vehicles can be flat towed, but quite a few are affordable, especially when used. Every vehicle will need a tow bar plus wiring and braking add-ons.
Transmissions Challenged
A dinghy vehicle’s transmission and transfer case must continue to be lubricated as it rolls with the engine off. There’s no absolute rule here. Some vehicles can be towed thousands of miles, some a few hundred and only below a certain speed. Some models may be flat towable in automatic and manual transmission models, and some in one but not the other. Generally speaking, an all-wheel-drive or 4-wheel-drive vehicle must have a transfer case that can be shifted to neutral. Take note: With electronically controlled transmissions and transfer cases, traditional rules don’t apply.
Edmunds.com, a reliable site that reviews and lists equipment available on new and used vehicles, says that among the things you must know to flat tow are whether to pull fuses and which ones, what must be switched on or off, how to position the shift lever, and how often you must stop and run the engine for lubrication (sometimes as often as every six hours). In general, ignition switches are placed in the “accessories” position so the steering wheel will turn.
Still, you have to know which vehicles are flat-towing approved.
Dinghy-Towable Vehicle Lists
First, decide the kind of vehicle you want. Do you just want a car that can be towed, then driven into town? Or do you want an all- or 4-wheel-drive SUV or truck that can take you off road?
Then consult a list, such as the list from Motorhome.com, which has dinghy vehicle guides going back to 1990. Downloads are free. Goodsam.com also publishes the list. The 2019 guide lists 65 vehicles, from subcompact cars to 4-wheel-drive pickups. It tells you speed and distance limits, plus what needs to be done before towing.
Talk only to industry people you absolutely trust:
- Dealerships. Don’t ask just any car salesman. Let’s face it: Some salesmen are knowledgeable and some know less about cars than your dad taught you when you were 10. A few just make stuff up to get sale. Even if he doesn’t offer what you need, one you trust might have suggestions.
- RV dealership. Ask about dinghy towing but emphasize that you want a car that is manufacturer-approved for four-down towing.
- Your mechanic. Mechanics see and hear a lot. If they have seen two or three of a model that fail even though the factory approved them for dinghy use, they’ll tell you. And if they don’t know, they’ll probably tell you that, too.
Check the Owner’s Manual First
Before you buy any vehicle for dinghy use, check the owner’s manual for that make, model and year. Edmund’s says an owner’s manual will explain whether a vehicle is approved for dinghy towing and how towing must be done. “Check the manual,” Edmunds emphasizes, “then check again.” Remember: Dinghy approval for a model can change from year to year, so get the right year manual.
Owners manuals, even for past years, usually can be found online by searching “year make model owners manual.”
Modifying for Dinghy Towing
Can you modify a vehicle for dinghy towing? Technically, yes. An RV dealer can do the work. But it’s risky. Modifications may not protect the vehicle’s transmission, transfer case or electronics as the accessories maker claims. Modifications also will invalidate the vehicle manufacturer’s warranty, so if the vehicle fails, you’re out a ton of money.

Many factors that influence tire replacement on an RV are identical to those for other vehicles, but one stands out as decidedly more relevant to RVs: tire age.
Why? RV tires may deteriorate before the tread wears out if they’re old. RVs travel fewer miles than daily drivers for most people, so the tread often remains high, even after years of use. Sure, some RV owners—especially nomads who live on the road—drive 10,000 miles a year. But the average RV owner drives less than 5,000 miles yearly, according to Guaranty RV Super Centers, an Oregon-based chain of RV dealers.
A 5-year-old tire may not show much wear at 25,000 miles, but what kind of shape is it in? It’s possible that a tire with half its tread will begin to show sidewall cracks, largely from the ultraviolet rays in sunlight and from atmospheric ozone, but also from the stress of heavy loads, the heat from high speed, and improper maintenance and storage.
Check the manufacturing date on each sidewall—the last (right-hand) four numbers after the DOT marking. The first two of those numbers are the month and the last two, the year. For example, a tire stamped “0110” was made in January 2010. Michelin recommends having the tires checked when they’re 5 years old.
By the seventh year, or if signs of non-tread wear show before then, consider getting new shoes. If tires check out, keep running them. When replacing just two tires, place them on the same axle at the rear.
Here are steps to make your tires last:
Maintain Proper Pressure
Go by the tire manufacturer’s inflation recommendation. Don’t overload your tires, and just as importantly, don’t underinflate. Goodyear says every pound of under-inflation decreases a tire’s ability to carry 20 to 30 pounds of payload. Goodyear recommends checking pressure when tires are cold, before and after each trip (even short ones), when TPMS indicates a problem, and monthly during storage.
Don’t Overload Your RV
An RV that’s too heavy unduly stresses tires. It also can degrade handling. Distribute contents as evenly as possible to avoid stressing just one tire. Weigh your RV while it’s loaded (and with full tanks) on a truck scale.
Rotate Tires
Tires wear more evenly and last longer as a set if they’re rotated. Including your spare in the rotation ensures that it won’t age beyond its useful lifespan. Check your RV owner’s manual, but as a guide, rotate yearly.
Keep Tires Balanced
Tires should be balanced when new or rotated to the other side. Unbalanced tires will ride roughly as they bounce.
Store Your RV Properly
If possible, store indoors in a cool, dry place. Outdoors, try to find an area shielded at least part of the day from sunlight. Unload your camper. Inflate the tires to 25 percent over the recommended maximum. Clean the tires with soap and water, but avoid sealants and dressings. Place the RV on blocks if possible. Shield the tires from sunlight with covers. It may be helpful to park on a layer of plastic between the tires and pavement. To avoid flat-spotting, move the RV every three months but not in cold weather. If tires are stored indoors, keep them away from ozone-generating heat sources.
Replacing Tires
Buy tires similar or identical to those already on the RV. Match the size and load ratings of original tires. On trailers, never mix increasingly available radials with bias ply, which are being phased out. You can use bias trailer tires even if your tow vehicle has radials.
Photo Credit: tcpglobal.com
RV weather seals—also called gaskets or weather stripping—are as important in warm weather as in cold, and warm weather is a much better time to replace them if you do the work yourself. Warm weather keeps rubber gaskets more flexible, making them easier to work with.
You have three very easily understood reasons for renewing weather seals before summer. Seals that are in sound condition:
- Keep air-conditioned air in your RV and hot, humid air out.
- Prevent water leaks from heavy summer thunderstorms and road spray.
- Block out insects and other pests.
Weatherstripping is likely to deteriorate around entry doors, storage compartment doors, windows, operating roof vents and slide-outs.
Installation Types Differ
Some weather seals apply with glue, often (but now always) in the form of an adhesive backing on the seals themselves. The adhesive surface is exposed when you peel off a plastic or paper cover. These seals are common on entry doors.
Seals for sliders often are fastened with glue but require an application of liquid adhesive, since they typically don’t come with a pressure-sensitive backing. Some mount in tracks on the RV.
Other weather seals press into place. Many have a slotted surface that attaches to the edge of a window or compartment door, or to an upward-facing, leak-discouraging lip on the frame of a roof vent.
Finding a Proper Gasket
Seals may differ by make and model of RV, but buying more-expensive original equipment seals usually is not necessary. Several manufacturers offer aftermarket window, door and vent gaskets in a range of sizes, styles and prices. They typically have catalogs in RV stores or online charts to help find the proper fit. For instance, if you go to manufacturer Steele Rubber Products’ web page and click on slide-outs, you’ll find single and double bulb seals of varying heights and widths, seals with fins, seals with track mount, and seals with peel-and-stick adhesive, all shown in profile. Matching a seal profile usually turns up a match.
Other replacement gasket suppliers include CR Laurence, Bling-Flagship, Lightman, Minor Rubber, Perma-Fit, Trimlok and Zoro.
Simple Installation Steps
For a proper fit:
- Watch weather seal installation videos online before proceeding.
- Find and buy the appropriate seal, using in-store or online assistance.
- Take photos with your cell phone or digital camera of the old seal as it was properly installed, then intermittently during removal, so it’s easier to reverse the process during reinstallation.
- Read the instructions included with the new seal.
- Remove the stripping.
- Clean dirt, corrosion and glue residue from the RV surface. You may need a scraper and solvent. Take care not to damage paint and decals.
- Fit the new gasket, then install by using pressure-sensitive adhesive, applying adhesive or pushing a seal into place, depending on type. Remember: It’s easier to curve flexible rubber seals in warm weather than in cold weather. Working in the shade will prevent excessive heat from fiberglass or metal surfaces.
- Using a utility knife or shears, trim the seal to fit, then apply sealant to any small gaps that may result.
When buying slider seals, make sure they’re wide enough to overlap or cover the gap between the slide-out and the adjacent, stationary RV wall. That keeps out water, dust, pests and debris.
Lithium-Ion Batteries: Expensive, But More Efficient, Longer-Lasting
Written by Matt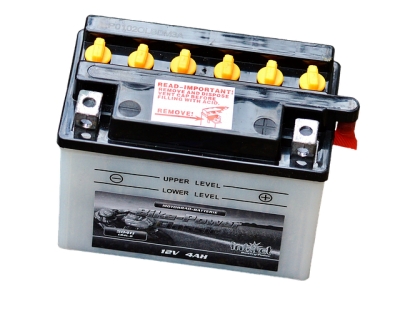
Lithium Ion batteries, or Li-ion, are a very real upgrade as deep-cycle batteries in your RV. Although more expensive, lithium ion offers a number of advantages over lead acid batteries.
Li-ion technology is young but not new. Li-ion batteries power many cell phones, laptops, power tools, consumer and commercial drones, and gasoline-electric hybrid vehicles.
Li-ion battery advantages:
- Weigh less.
- Are smaller compared with an equal-strength lead acid battery.
- Don’t vent, so they can be stored in more areas than traditional batteries.
- Maintain amperage during discharge.
- Last longer before needing replacement.
- Allow deeper discharges.
- Charge faster, making them more compatible with solar charging.
- Require no maintenance.
- Better resist damage from heat.
- May have smart management systems to prevent damage.
- Use a non-corrosive electrolyte.
Li-Ion battery disadvantages:
- Cost 3 to 5 times more than weaker lead acid battery.
- Can catch fire if damaged.
Price versus Performance
You will pay considerably more to purchase a lithium-ion battery, but over time, costs nearly even out.
Joe O’Connor, a senior application engineer at Mercedes-Benz Energy and author of the book “Off Grid Solar,” wrote on medium.com that the initial cost per kilowatt hour (kWh) with a lead acid battery is $131. For a Li-ion battery, it’s $530—a whopping 400 percent of the cheaper battery’s purchase cost.
But Li-ion batteries cycle 1,000 times for cheaper units to 4,000 times for higher-quality cells before they fall to an 80 percent state of health, compared with just 200 to 1,000 discharges for a lead acid battery. That means they should last years longer. By the time the Li-ion battery needs replacement, its total cost is just 11 percent more than its lead acid counterpart, O’Connor’s figures show.
More Convenient, More Powerful
There’s no question about the convenience of Li-ion compared with lead acid.
Li-ion batteries require no maintenance. There’s no need to top off water as there is in the lead acid battery—a task that’s difficult when batteries are hard to reach. Skip that chore with a lead acid battery, and battery life shortens dramatically.
Lead acid batteries also fail sooner if they are discharged beyond 50 percent. A Li-ion battery can be discharged 80 percent without damage. A Li-ion battery will supply power longer on each charge than a lead acid battery will.
When a Li-ion battery is discharging, there’s much more power on tap—5 times as much available power at constant current as a lead acid battery, according to O’Connor. The available power on lead acid batteries diminishes steadily as the batteries discharge, making them far less efficient in running an RV’s electronics.
Faster Recharging
The fast charging time of a lithium-ion battery is 2 to 4 hours. That’s a fraction of the time needed to recharge a lead acid battery, which is 8 to 16 hours, depending on the quality of the battery.
A Li-ion battery is just more willing to accept a new charge—about 99 percent efficient versus 85 percent for lead acid batteries. That makes Li-ion especially attractive for solar recharging. Solar panels, like Li-ion batteries, involve a high expenditure up front, but they save money over having to recharge with a generator, which needs gasoline or diesel fuel to run and oil for lubrication. With more efficient lithium-ion batteries, a smaller—and cheaper—solar array will be just as efficient as a larger array replenishing lead acid batteries.
The Future
Batteries for off-grid use will continue to shift toward lithium-ion, with a more pronounced move away from lead acid within just a few years. Expect Li-ion prices to drop as more manufacturers enter the market, increasing competition.
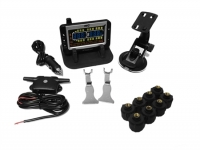
If your tow vehicle, motorhome or trailer lacks a tire pressure monitoring system, commonly referred to by its initials, TPMS, the safety feature isn’t difficult to add. Adding TPMS is a good idea for RVers.
Losing a tire at speed is nasty business. The sudden loss of pressure—a blowout—can cause a vehicle to swerve or even to roll over. Tires that fail can also shred, and that can cause considerable damage to RV bodywork, especially aluminum bodies.
Losing a tire in the middle of nowhere on a long trip is no picnic, either. Getting a truck to come in and jack up any of your vehicles to change a tire is often far from instantaneous.
How TPMS Works
TPMS add-on systems basically have two parts—the sensors, which wirelessly send signals reflecting air pressure from each tire, and a wireless receiver, which gathers the information and displays it in any of several ways, depending on the system.
The monitor might display actual pressure in each tire, or it might simply show a message to check a tire, or all your tires. Individual readouts are the better choice.
Original equipment systems have monitors that are integrated into the dashboard. Aftermarket systems can’t do that, of course. They have monitors that attach to the instrument panel, on the surface or on the lower edge, or on a console surface. They’re reasonably attractive, so adding one won’t spoil your view of the instrument panel. Because they use their own batteries, there are no wires to run or connect.
Signals are sent wirelessly. Some sensors are mounted internally, which will cost more to mount because you’ll need a garage or RV center to do it. Then the tires and wheels will have to be balanced. The alternative is sensors that screw onto valve stems as replacements for valve stem caps. Manufacturers say there is no need to rebalance tires after replacing the valve caps with the lightweight sensors.
Some systems, in addition to monitoring tire pressure, monitor tire temperature and send readouts to the same monitor.
How Many Sensors?
TPMS kits come with different numbers of sensors and are priced accordingly. Four would cover your tow vehicle only, and not even that if it has a dually rear axle. Kits usually include a tool to help mount the valve-cap type sensor on the inner wheels.
It’s best to get a set that has enough sensors to read the pressure of each tire on your tow vehicle, your trailer and your spares. If your motorhome tows a dingy, get sensors for that vehicle, too. Look for models that offer, in addition to the sensors in the set, additional individual sensors or supplemental sets of two. That way you can get as many sensors as you need. You also can replace sensors that go bad. Regardless of where your sensors are, they’ll read out on the dash display you install as long as they’re compatible—the same brand and model.
Sensors are water resistant to help them hold up, a must if you’re towing a boat trailer. Screw-on sensors typically must be removed to add air to a tire, then screwed back on.
Lifespan
Sensors last about five years. After two years you should replace the watch-type flat batteries. Better to replace them than have them fail on a trip. Some monitors have rechargeable batteries, which don’t have to be replaced but can be recharged from the power port/lighter.
A nice thing about the screw-on type of TPMS sensors is that you can remove them while your RV is stored. That prolongs the life of the sensor and the batteries, if you remove them too.
Cost: Surprisingly Inexpensive
Costs vary by make, model and retailer. In general, a set of TPMS and temperature valve stem caps for eight wheels costs $380 to $600, including the display monitor. A set of 8 with internal mounts for wheels adds about $100. A color monitor might also elevate the price by $25 or so, but it’s useful for systems that measure both pressure and temperature.
Photo Credits: technorv.com
Many standard RV fans are modest performers. Fortunately fans come in standardized sizes, making it easy to upgrade.
Roof vents are 14 x 14 inches in the main living area and possibly in the bedroom, and probably 6 x 6 inches in the bathroom. Even vents without fans are likely to be 14 x 14.
There are quite a few reasons to replace a fan, even if it’s working properly:
- Increase airflow. Some fans, even the same size, can move more air. Airflow is measured in CFM—cubic feet per minute. Improving airflow helps to cool indoor temperatures. Boosting airflow in the bathroom reduces odors and prevents mold.
- Reduce noise. Some standard vent fans are noisy—doubly irritating if they’re not efficient.
- Add features. You can boost ease of use with a temperature sensor, rain sensor, remote control, multiple speeds, reversible blades or a rain hood.
- Protect a pet. Leaving a dog or cat in the RV is dangerous without certain fan features.
The best way to choose a fan upgrade is to answer some questions before buying:
What’s my budget?
Standard-grade roof vent/fan replacements cost about $60 to $110 for manual models. Installation would be extra, but many RV owners can install a fan themselves. They are powered by 12V wiring.
Adding features raises the price, but significant upgrades don’t cost much individually.
A model with remote controller, electric lift, built-in rain hood plus temperature sensor costs about $240 to $300. Aftermarket rain hoods range from $25 to $75. Prices vary by as much as 50 percent for the same model, so shop around, and remember that there’s never a need to pay list price.
What color do I want?
Inside, just about every fan is colored white or off-white. The most common color choices for lids are white and smoke. The smoke lids allow a bit of extra light to enter your RV. Some fans have clear blades, admitting even more light.
Rain hoods are available in a variety of colors, but most common are white, beige, grey and black.
Is remote control worthwhile?
Some see this as unnecessary, but remote control eliminates having to reach up to turn the unit on or off, get up from your seat to change a setting, or run wiring to a wall switch. Remote control is a boon for short RVers and those with disabilities. It will add maybe $35 to the price of an otherwise similar unit.
Do I want my fan to close automatically in the rain?
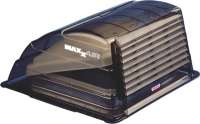
Most fans shouldn’t run in the rain, but after you open manual fans and turn them on, they keep running, even if it pours. Not only would rain enter the RV, but it also would damage the fan motor. Consider a model with a rain sensor, such as the Fantastic Fan 803350. It will turn off and close when rain hits. The one problem on any fan of this type is a rain sensor may stay wet, preventing the vent from reopening and the fan from coming back on—potentially deadly for pets.
Do I want to run my fan in the rain?
If you want to exhaust air in the rain, avoid the rain sensor but get a model with a rain hood, such as the Dometic EZ-Breeze Vent Fan, about $90. It allows use 24/7, rain or not. The MaxxFan Model 00-07000k, about $300, pops open under a built-in rain hood but closes almost flat and has a temperature sensor, plus remote control. An alternative is to find a fan you like and add an aftermarket rain hood, such as the Maxxair 933067, about $50. Less expensive hoods are available. Make sure the hood you buy won’t significantly reduce airflow. The more venting the hood has on its rear surface, the better.
Must I cool a pet while I’m away?
You have to care for your pet, even if you’re not physically in your RV. The right roof fan helps.
Just as important as leaving food and water is maintaining a safe temperature—ideally below 76F, and definitely below 80F. The best way to do that is to have a vent fan running. In addition to buying a model with a hood to allow use in the rain, or installing an aftermarket fan hood, get a fan with a temperature sensor, such as the Maxx Fan Model 00-07000k. In addition to shedding rain with its built-in hood, it cycles on and off to maintain the temperature, even if you’re not there.
Do I want a temperature sensor?
Even if you don’t have a pet, you might want this feature. The fan will automatically cycle on and off if the interior temperature reaches certain levels. That kind of comfort and convenience is nice to have for the few dollars a thermostat adds. It’s available on many fans in the $125-to-$150 range.
Do I want to bring air in as well as exhaust air?
During the spring or fall, or in the evening or morning, you may want to bring air in. This would be true especially if you have limited screened windows. To do so, you’ll need a vent/fan that can reverse its blades.
How much air does a fan move?
This might be especially useful to know in bathroom fans. You can’t easily increase the size of a bath fan to improve airflow, but you can increase airflow with a better motor and more efficient fan blades. Look at the CFM rating.
How noisy is the fan?
Unfortunately, many manufacturers don’t provide noise figures, measured in decibels (dB). If the product description doesn’t include the information, call the manufacturer or email to find out. There’s no guarantee, but a better-quality, more expensive motor and a higher number of blades typically increase air movement while lowering noise.
Coming home to—or waking up to—a comfortable RV is fairly easy to accomplish, and quite affordable. All it takes is a digital, programmable thermostat. Let’s face it: If you can program your coffeemaker to percolate before you’re out of bed, you ought to be able to program your heating and air-conditioning to be ready when you are. A programmable thermostat lets you do that.
Most RVs are equipped with old-fashioned nonprogrammable thermostats, which are analog, minimally adjustable, not very accurate and, quite frankly, cheap.
Installing analog thermostats at the factory is just one way manufacturers keep the suggested retail price of their RVs low. When you consider how much comfort and convenience a digital, programmable thermostat offers, and how low the price is in the grand scheme of things, leaving one off the standard equipment list ought to be a little embarrassing. But combine it with low costs for such things as standard plumbing fixtures, vents and cabinetry, and that sticker price really comes down.
It’s not prohibitively expensive to upgrade a thermostat, although installation of some units is best left to a professional. Even so, figure on $75-$150 for a DIY upgrade, or $300-$400 if you have the work done for you. For the year-round comfort the thermostat will supply, it’s a worthwhile investment either way.
Preprogramming is Key to Comfort
A programmable thermostat makes life in an RV much more livable.
First, the settings are more refined. It’s possible to set temperate changes ahead of time, such as an hour before you return to your RV from a day out and about, or in the morning, just before you routinely rise. Some models let you change settings at any time by Internet or by cell phone.
Then there’s the accuracy of the settings. Digital thermostats are much more accurate than analog examples. Analog settings are often off by 10 degrees—sometimes even more—creating a “freeze-or-fry” situation. Digital settings are more typically accurate to within 2 degrees, and often a single degree.
Programmable, digital thermostats are more likely to control both air conditioning and heat, rather than heat alone. Carefully read the specs on any unit you’re considering to make sure, however, because many less expensive digital models also control heat only. And remember: Just because a thermostat is digital doesn’t mean it’s programmable; check to be certain.
Naturally, as the number of features increases, so do prices.
Where To Buy
RV digital thermostats are available from quite a few sources, as an Internet search will quickly show. There’s Amazon.com, ubiquitous in any search; chain RV dealers, such as Camping World; and local, independently owned RV dealers.
RV dealers or shops may require you to purchase from them if you want installation service, so check ahead of time. Pro installation is sometimes required to preserve the thermostat warranty.
Compatibility
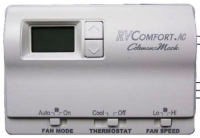
Not all thermostats work with all models of heaters and air-conditioners. Sometimes units made by a manufacturer aren’t even compatible with all of its own HVAC models. For instance, a good-performing programmable, digital thermostat, the Dometic 3109228.001, is not compatible with the company’s Penguin products, but it works with Penguin II. Sometimes substitute boards are available to make otherwise incompatible products work together.
Find out ahead of time if the thermostat you’re buying will work with your setup. That may be easier if you buy from a dealer or bricks-and mortar retailer with knowledgeable sales people. You can also send a question to the manufacturer or, if it makes the number available, telephone with your question. A Google search for manufacturer model number customer service telephone should help you find the number. Some e-tailers also answer questions with live chat or by phone.
Caution: Don’t depend too much on a community FAQ board. One we encountered posted a question about compatibility between the thermostat being sold and a certain air-conditioner. The first answer, simply, was “Yes.” The second answer, just as cryptically, was “No.” No help whatsoever!
Some things you may need to know and should ask before buying:
- Can the thermostat be wall-mounted? (That’s preferable for more accurate readings, since heat rises and roofs soak up considerable heat from the sun.)
- Is it compatible with my air-conditioner, heat pump, or furnace? (Look for make and model numbers to check.)
- Must I change any control panels? If so, which panels do I need?
- Must I add a wiring harness to make connections? If so, is a wiring harness included?
- Must I add or replace relays? How many?
- How is the thermostat powered—12V, telephone line or batteries?
- How do I ensure compatibility if I’m replacing my air-conditioner or heat pump?
- Does DIY installation void my warranty?
- Does the thermostat automatically switch between cooling and heating once the temperature is set? (This is highly desirable.)
- Does it have a backlit display for easy nighttime reading?
Some Models to Explore
Here are some digital, programmable thermostats to consider and their approximate cost:
- Dometic Model 3109228.001 Comfort Control Center. ($100)
- Dometic Model 3314082.011 Comfort Control Center II, or CCC2. Multi-zone for bigger RVs. ($135)
- Coleman Digital Wall Thermostat Model 8330-3482. Includes plug-type wiring connections. ($120)
Photo credits: airxcel.com

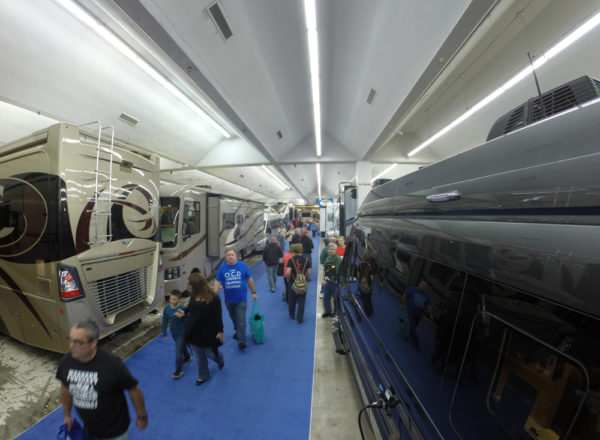
Have you ever walked into an RV showroom and thought, “If only this showroom were a little bigger, I wouldn’t have to go outside to look at more models.”
Attend the Atlanta Camping & RV Show, and you’ll get your wish. How does a couple of hundred thousand extra square feet sound?
 The Atlanta Camping & RV Show will be held inside Atlanta Exposition Center South, Jan. 25-27, 2019. It bills itself as the largest all-indoor RV show in Georgia, and with 211,00 square feet crammed full of every kind of RV imaginable, it’s not hard to see why.
Wear comfortable footwear. You’ll have walked miles if you’ve traveled very aisle and walked through every RV on the floor.
Nine Georgia RV Dealers Under One Roof
The space will be filled with inventory from nine Georgia RV dealers.
They present varying manufacturers that specialize in different types of RVs.
Most of the participating dealers will list on the show’s dealer web page the units they’ll display closer to the date of the show. It’s impossible for dealers to show every model from every manufacturer they represent, but here are some of the brands sold by participating dealers:
- Airstream
- Aliner
- Alpine
- Avalanche
- Bighorn
- Carbon
- Cricket
- CrossRoads
- DRV
- Forest River
- Keystone
- Little Guy
- Livin-Lite
- Heartland
- Palamino
- Palomini
- Prime Time RV
- Puma
- Raptor
- Solaire
- Sprinter
- Sunset Trailer
- Z-1
Wall-to-Wall RVs To Tour
 So, as far as your RV life goes, what are you thinking about right now?
If all you want to do is make some changes to your RV—a new awning, a better generator, a stronger hitch, a more comfortable couch or bed—here’s a chance to find countless makes and models of the products you’re considering, all in one place. You’ll probably discover a few that you had no idea were out there.
Dream a little. Even if all you want to do is improve the RV you have, by touring the new RVs—including upscale models—you’ll see established and coming trends. Just about anything that’s popular on new RVs becomes available in the aftermarket sooner or later.
If you want to upgrade—buy a bigger trailer, switch to a motor home, move from a Class B to a Class C or Class A—they’re all bound to be on the show floor. You’re lkely to see not only examples of those RVs, but also fifth wheels, toy haulers and the increasingly popular park or destination trailers. Just starting out in RVing? You’ll see more modest trailers, too, such as popups, teardrops and truck campers.
You can do a lot more than kick the tires. Test out the work triangle in a Class A kitchen. Get behind the wheel and see how it feels. Sit on a toy hauler’s fold-down deck and see if it’s the kind of outdoor setting that satisfies you.
If you’re seriously looking, bring your title. Dealers offer big discounts on show models, with very little wear from all those visitors and intact manufacturers’ new-RV warranties. Discounts of tens of thousands of dollars are common at shows on bigger, more luxurious models. Even a teardrop or popup will carry a hefty show discount. Many deals are done on the show floor. Dealers sell used RVs, so they’re likely to take yours in trade.
More than RVs
In addition to the dealers, more than 80 exhibitors will set up booths displaying accessories, such as awnings, patios, outdoor tables and chairs, foldout grills and firepits; replacement items, such as interior furniture, appliances and generators; and destinations, such as campgrounds, parks and communities.
You’ll also be able to hear talks and see demonstrations to help you better maintain, travel in, insure and use your recreational vehicle. Manufacturers of products and providers of services who conduct the demonstrations share information based on their knowledge of RV systems and RV life. Sometimes celebrity RVers do the talking.
Among the topics will be things to do and avoid on short and long trips, how to find good campsites, hiking, and memberships that enhance the RV experience.
And of course, any time you get thousands of RVers together, you just get a chance to chat one another up and discover great tips about RV living and places to visit.
Event: Atlanta Camping & RV Show
Venue: Atlanta Exposition Center South
3850 Jonesboro Road
Atlanta, GA 30354
(I-285 at Exit 55)
Dates: Jan. 25-27, 2019
Hours: Friday, 11 a.m.–7 p.m.; Saturday, 9 a.m.-7 p.m.; Sunday, 10 a.m.-5 p.m.
Cost: $10, ages 17-54; $9, age 55 and older; $6, ages 6-16; age 5 and under, free.
Parking: Free
Directions: The Atlanta Exposition Center South is about a 2-hour drive south from Crossing Creeks RV Resort & Spa.
More...
Going North or West with Your RV? Be Prepared for Snow
Written by Matt
If you’re planning to venture into colder climes with your RV for some winter camping, there’s plenty you should do before you go—and while you’re there.
Hitting colder areas with your RV is a welcome activity for many. There are ski slopes or cross-country ski areas to try, maybe just the sight of some snow-covered mountains to experience, and perhaps family to visit.
Don’t take the trip lightly. You must act to protect your RV and yourself.
Protecting Yourself
Do you have a warm winter coat or jacket? Gloves that can protect you not just from the cold temperatures, but also from snow and ice? A winter hat? Really good sunglasses? Boots in case it snows? Some really warm sweaters and sweatshirts? An electric blanket for cold nights?
All may come in handy up North or out West, especially in higher elevations. Consider dressing warm when you drive instead of turning up the heat, which makes some drivers drowsy. Include a pair of thin driving gloves to ward off the cold feeling of the steering wheel without reducing grip.
If you’ve ever driven with snow on the roadside and the sun shining a day after a storm, you’ll know why good sunglasses are a must. Those conditions can be blinding.
You can get anything you need online if you can’t find it locally.
Protecting Your RV
Winter driving is tough on a vehicle. You must do quite a few things to be safe on the road and at your campsite.
Snow Shovel and Traction Aid
A collapsing shovel saves a bit of space, but make sure it’s strong and lightweight. A bag of sand is a good idea in case you get stuck on ice or packed snow. Pour the sand into a container with a locking lid to keep your storage space tidy.
Antifreeze/Coolant
Have your antifreeze/coolant checked. A 50/50 mix of antifreeze/water should protect your engine to 50 degrees below zero. That will raise the boiling point, too. Make sure hoses are sound. Carry a vial of stop-leak additive just in case a hose springs a leak. Quality duct tape can help temporarily, along with a spare gallon of antifreeze.
Windshield Washer
Put winter fluid in your washer reservoir to prevent freezing. (Never add engine-type antifreeze to it; doing so would damage your RV’s finish.) Check wiper blades. They’re cheap and easily replaced.
Water Lines
For campsite hookups, consider heated water lines so they don’t freeze. The safest routine is to fill your tank and disconnect, then store your empty hose. Reconnect when you must refill, then disconnect and empty the line again.
To keep lines from freezing, run your propane furnace and space heaters at all times when temperatures will be close to or constantly below freezing. Place conventional blankets over windows and doors where cold air may enter. (Keep a vent open, however, to allow moisture to escape.) Place small electric space heaters in the vent area to protect water lines there. Install heating pads on your fresh water tank and keep them turned on.
Waste Lines
After emptying your tank, make sure the hose is clear before storing it. Any remaining residue—including solid waste—can freeze and block the pipe. Install heating pads to both gray and black tanks—and keep them turned on. Place a small electric space heater in the wet bay.
Side Skirts
Temporary skirts help keep you and the lines warm. If there’s snow on the ground, you can pile snow along your camper to keep the wind from getting underneath. Avoid shoveling your RV in.
Fuel Treatment
If warm-climate fuel is in your tank, it may not be formulated for Northern temperatures. Pour diesel additive or, if you’re powered by gasoline, dry gas into the tank. Pour the appropriate additive into your generator tank, too.
Treat Snow with Respect
Mount snow tires on your tow vehicle or motorhome on all axles. Carry chains for the drive wheels. Towing in snow can be dangerous. Be extra cautious, driving slowly and keeping a longer distance behind vehicles. It’s easier to drive a motorhome in snow than it is to tow. If the forecast says a storm is coming, there’s no shame in deciding to leave early or stay an extra day or to.
Alternative: Winterize Your RV
You can always prepare your camper for winter and just use campsite facilities. It’s better to have goose bumps going to and from the facilities than a frozen water or waste line.
Photo Credit:Quora.com

Football season is upon us, and that means tailgates are as common as touchdowns.
Whether you’re tailgating outside the stadium or watching the game on your RV’s outdoor TV while you tailgate at Crossing Creeks RV Park & Resort, you’ve got to show your team colors.
You can find a host of ways to do that, beyond (and including) apparel in your team’s colors: flags and pennants of many sizes, decals for your RV, logo-emblazoned grills, a fire pit to warm up the after-game gathering, and tables that look like the playing field. You can find gear that tout the pros or college ranks.
Here are a few items to help you back the team while you’re enjoying good food, fine beverages and great company. You can order just about anything team-related online, shipped right to your door. Not available: A victory, but that’s why you al get together and cheer on every play.
 NFL Flag
Fly those colors as the Falcons fly toward a Super Bowl berth. You can go understated with a garden flag, step it up with a 44-inch double-sided house flag or go all out with a 5-foot banner that mimics the Stars and Stripes. Each banner bears the Falcons’ black and red colors and the stylized Falcon logo. From nflshop.com. Cost: $14-$40.
RV Decals
Your RV may not be a ramblin’ wreck—at least we hope not—but you can let everyone know it carries genuine Yellow Jackets fans. Pick up precision-cut decals of many sizes for Georgia Tech and other schools at fanatics.com. Cost: $5-$12.
Team Grill
How ’bout them dogs? No, not the Georgia Bulldogs. The hot dogs. Or the steaks, the burgers or the salmon filets? You can cook them over a portable iron grill bearing the University of Georgia’s big “G” emblem. It’s got built-in handles for easy carrying and storage when the party’s over, and both ardor and the coals cool. From fansedge.com. Cost: About $80.
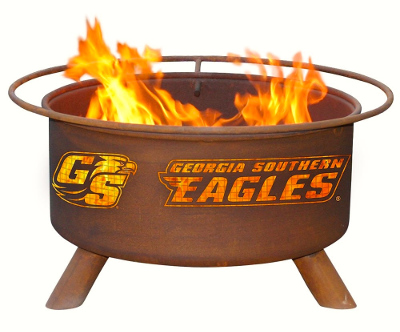 Fire Pit
Even Southern nights get cool in September and October for that post-game gathering. You’ll feel a warmer glow with a fire pit that bears the Georgia Southern Eagles logo, or the emblem of another favorite team. This fire pit measures 24 inches in diameter. It includes a grate for grilling, a poker and a weather cover. The team pits are available from serenityhealth.com. Cost: About $250.
Tailgate Table
After grilling and whipping up some great side dishes, you’ll need a place to put out that tasty spread. How about an all-aluminum, non-rusting Georgia State tailgate table? At 2x8 feet, it’s got plenty of room for everything you prepare and whatever your guests contribute, but it folds to a mere 2x2 feet to slip neatly into one of your RV’s storage areas. The painted surface wipes clean faster than a tailback can hit a hole in the line. The table looks like the Panthers playing field, with logos at the 30-yard lines. Look for other schools, too, at Fansedge.com. Cost: About $200.
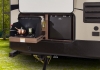
If you want to cook outside the RV—and let’s face it, that’s what most RVers do on most days—you have to set everything up: the grill, the table, the chairs.
Now you can forget about the grill. No, sandwiches are not on the menu. You’re still going to cook out, but if you have one of the many new RVs so equipped—including trailers, fifth wheels, and Class A, B and C motorhomes—you’ll have a foldout grill or kitchen that makes outdoor cooking simpler. More comprehensive cooking centers are a tailgater’s dream.
Outdoor cooking areas aren’t new to RVs, but originally the outdoor food-prep areas were the only one the RV had, as on a teardrop camper. On a bigger RV, an outdoor kitchen is in addition to, not in place of, the RV’s traditional interior kitchen. And more manufacturers are making the external ktchens available as options or standard on upscale RV models.
 You might just be surprised by how well equipped some of the outdoor kitchens are. Few are identical, even among those offered by a single RV manufacturer.
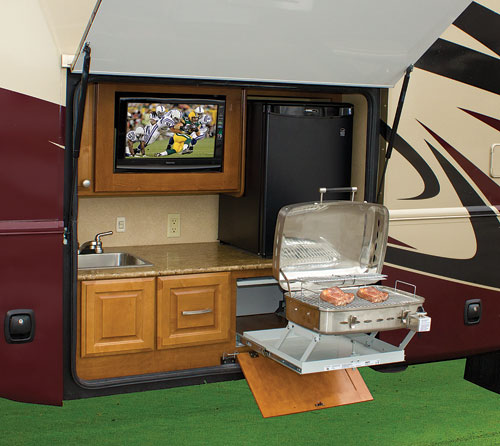
The more luxurious examples have not only a gas grill, but in many cases also a counter, a sink, a refrigerator, and cabinets and/or drawers for stowing away all the utensils and accessories, even dishes.
Outdoor entertainment centers have flat-panel high-definition TVs; stereo receivers, disc players and speakers; and in some cases, sinks with running water and bars, or at least a counter that can be used as a bar. There are even some kitchen/entertainment center combinations.
Basic Fold-out Kitchens
A good example of a basic kitchenette is available on some Keystone Hideout models. The kitchen has a slideout gas cooktop and a mini fridge beside it. There’s also a shelf/cubby area for storage. It’s compact and efficient. Probably best suited for breakfast, it does not include a grill.
Everything—Including the Kitchen Sink
More elaborate outdoor kitchens have everything you need to refrigerate food; cook it on a foldout stovetop or grill, or in a counter-mounted microwave; and serve with ease from the countertop. Almost any upscale outdoor kitchen will include a sink with running water, even if only a small one.
Grills and stoves may be mounted in drawers that slide out, or on arms that swing into position.
A nifty design on some outdoor kitchens is a fold-up door. The cover is flat when traveling, painted and decaled to match the side of the RV. When opened, it serves as an awning, deflecting rain and sun.
Entertainment Center
The Thor Outlaw Class A Toy Hauler has an entertainment center that seemingly has everything but the big game. It’s perfect for a tailgate bar setup. The 50-inch TV is nestled into built-in cabinetry. Below it is a faux stone countertop with a sink and running water.
Under the counter are built-in cabinets and a bar fridge. To the left of the entertainment center is a half-bath with an exterior door—perfect for accommodating party guests without having them walk through your living quarters.
Some manufacturers mount the giant TVs on slides. An end-mounted hinge allows the TV to be viewed from the kitchen, or when swung away, from the picnic table.
And Then There’s the Pull-Behind Kitchen
Maybe the neatest outdoor kitchen you’ll run across isn’t available from an RV dealer. It’s a roomy home-built mobile kitchen made from a used popup trailer, with the look of an old-time refreshment stand. It’s pulled behind a motorhome. Check it out.
Now, that is a tailgate party waiting to happen.
Photos: Courtesy of Keystone RV Co.

If you’re a family where cell phones and vehicles last for years, you may be missing out on the latest tech features and conveniences, including hands-free calling.
But don’t think you have to scrap your older but perfectly maintained Ram, F-150 or Silverado tow vehicle, or an old but trusted dinghy, just to get something as simple as hands-free calling. That would be as wasteful as buying a new cell phone every time the manufacturers bring out a new model—which, as with truck manufacturers, is every year, or close to it.
To be able to safely take a call or make a call while driving should be a priority. In some states, it’s not even legal to take or make a call any other way while on the road. Fumbling with a phone can take your eyes off the road longer than you might think. An AAA analysis of data from the Virginia Tech Transportation Safety Institute indicates that taking your eyes off the road for just two seconds doubles your chance of an accident.
Here are affordable ways to get hands-free calling.
Aftermarket Radio
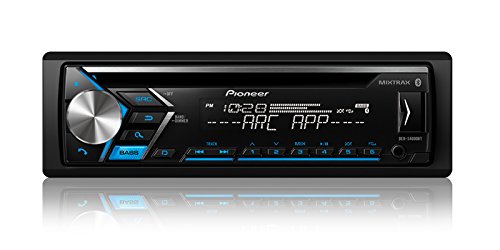
Many aftermarket radios facilitate a wireless connection between the radio and phone. Incoming calls go directly to the radio for two-way conversation if you enable the phone before driving. And you’ll be able to place a call hands-free with voice recognition.
A quality aftermarket radio provides other advantages, too, such as Sirius radio reception (with a paid subscription), better AM/FM reception, and an input for external devices such as an iPod. Bluetooth would mean no physical connection is needed for music or calls. In vast stretches where radio reception is nonexistent, being able to play your favorite music or an audio book can help you to relax and keep you alert.
Make sure the radio you buy is compatible with your year, make and model vehicle. Sometimes inexpensive dashboard fillers are needed; to fit, an aftermarket radio can be too small, but not to bigYou can keep your old speakers if they’re in good shape.
Cost: $150-300 for radio; $0-75 installation; $10 per month and up for Sirius subscription
Cell Phone Interface
As an alternative, you can add an aftermarket device that mimics General Motors’ OnStar and handles your incoming and outgoing cell calls.
A good example is the Hum from Verizon. This small black box clips onto the driver’s sun visor. It’s physically unobtrusive and reasonably attractive.
The Hum and similar devices wirelessly link to all cell phone calls while you’re driving. A microphone picks up your voice and a speaker plays the incoming call. Since Hum’s wireless receiver plugs into your vehicle’s onboard diagnostic port, it alerts you to potential problems, and it knows when your car breaks down or is in an accident. A service provider will call and ask you if you need assistance. You also can tell it to call 911.
If you use your vehicle for business, it logs your location and mileage. Logging miles just for calculating fuel mileage or maintenance needs is helpful.
Hum has an internal battery that must be recharged every month or so by plugging a cord into your vehicle’s power outlet. If you forget to recharge and your battery runs low, you’ll get an email reminding you to do so.
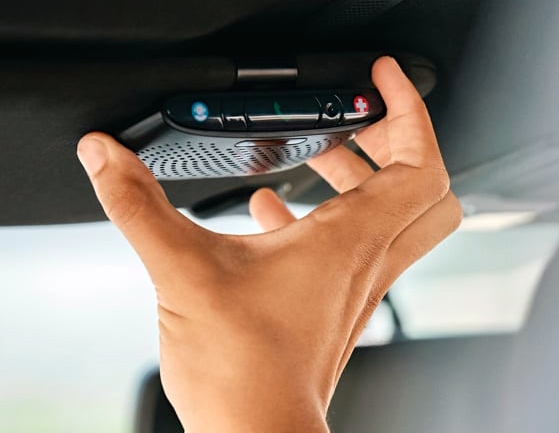
Cost: $80-$100 to buy the device, plus $10 per month service.