Welcome to Crossing Creeks RV Resort & Spa in the heart of iconic Blairsville

Your RV (25)
The more furniture you place into your RV, the more limited the space—and the storage. But there is one way to cut your loss of space: Buy furniture that can store things or adapt the furniture you have for convenient storage and retrieval.

Do you now where your RV water supply is coming from?

Millions of people buy extended warranties every year—for toasters, computers, personal vehicles and, yes, recreational vehicles, both motorhomes and towables. Are extended warranties worthwhile? It depends.
Most RVers power a generator with gasoline, and a few with built-in units use diesel fuel. For many RVers, however, especially owners of towables, propane is becoming increasingly common.

It’s a hook-and-loop fastener in generic terms, but the original brand name was Velcro and this is how we generally refer to these products. If you haven’t already, form an attachment to this versatile product and its variations. You’ll be glad you did.
How To Clean Your RV Living Area of Coronavirus Pathogens
Written by Matt
With coronavirus pathogens still present across America, keeping the living area of your RV disinfected becomes more important than ever.
Many of the cleaning agents you’ve been using in your RV living area are effective against coronavirus pathogens, but others may not be. If you decide to use cleaning products aimed at coronavirus pathogens but unfamiliar to you, it’s important to use products properly so they don’t harm fixtures, furniture and electronics.
The federal Centers for Disease Control lists cleaning agents that will kill coronavirus. You’ll have to look for numbers on each cleaning product label to see which qualify as CDC-approved disinfectants. You’ll also have to read the labels of individual products carefully to make sure they are compatible with the varying materials in your RV.
RV living spaces contain materials that are different from those in a motorhome cockpit or tow vehicle interior. For products to safely disinfect vehicle interiors, see our companion piece.
Match Materials, Cleaners
The living area of your RV contains pretty much the same materials as in a sticks-and-bricks home, so you can usually use the same cleaning agents that you would use at home. You just have to make sure they don’t just clean but also kill coronavirus pathogens. Cleaning can remove some virus pathogens but doesn’t kill them.
Some agents are hard on certain surfaces, so read the labels carefully. Certain foaming bathroom cleaners, for example, can destroy acrylic surfaces. Call your RV manufacturer’s customer service line for advice on what makes up the surfaces in your camper and what can clean them safely. The number is in your owner’s manual, or you can search for it online. Have your RV serial and model numbers available, since manufacturers do change some materials from year to year.
What To Use
In the living area, disinfect surfaces that you routinely touch: countertops, handles, knobs, cooking surfaces, switches, bathroom and toilet surfaces, plumbing fixtures and dinettes. You’ll also want to clean electronics, including computers, keypads, your cell phone and remote controls, all of which require special care.
In general, to disinfect living-area surfaces, it’s best wear disposable gloves. Even if youi do, wash your hands for 20 seconds with soap and water after cleaning.
Do Use
- Bleach. Use only on colorfast, non-porous surfaces, such as countertops, sinks and ceramic tile floors. In a bottle, mix 4 teaspoons of bleach with a quart of water. Wipe it on and let it work for four to five minutes, then rinse with clear water and wipe dry to avoid damage. Add a cup of bleach to a gallon of hot water for nonporous floors. WARNING: Mix bleach with water only. Combining it with other chemicals or cleaners could generate poisonous fumes or even explosions.
- Hydrogen peroxide. Use the standard household 3 percent solution—that’s the way you buy it— on nonporous surfaces. It’s especially good on metal, such as handles and drawer pulls. Let it stand for about 10 minutes. It actually does not have to be wiped off because it evaporates, according to Consumer Reports. Do not get it on fabrics, which it will stain permanently. Never mix it with other cleaners or chemicals.
- Isopropyl alcohol. It is safe for most surfaces and must contain at least 70 percent alcohol to be effective. Many disinfectant wipes contain alcohol. It must remain on the surface at least 30 seconds before being wiped off.
- Disinfectant cleaners and sprays. Use on hard surfaces only, wiping on and allowing to stand 30 seconds before rinsing off and wiping dry. See special instructions from Good Housekeeping on how to use disinfectant spray on a paper towel to clean phones. Clean remote controls, computers and keyboards the same way.
- Soap and water. This would include detergent, which is even more effective. Soap will clean off grease and surface dirt, making it tougher for pathogens to take hold. Scrub vigorously for soap to be effective, using a cloth or paper towel, plastic abrasive scrubber, or a sponge you’re willing to throw away. The soap breaks down the fatty outer surface of the coronavirus pathogen, rendering it harmless. Let stand for four minutes, then rinse with clean water and wipe dry. Use mild soap and water on leather or cloth upholstery.
- Disinfectant mop pads. Use one of these on hardwood floors, which would discolor with bleach.
Do Not Use
- White vinegar. It will not destroy coronavirus pathogens. It can, however, clean the surface of dirt where pathogens can lodge, including on hardwood floors. Let it dry and finish with a disinfectant.
- Simple Green All-Purpose Cleaner. Only industrial-targeted Simple Green Disinfectant will kill coronavirus pathogens. Regular Simple Green All-Purpose Cleaner is versatile and will clean surface dirt and grease, so it’s a good way to start on hard surfaces to rid them of the dirty layer where coronavirus pathogens often lodge. But then you must rinse, dry and follow up with a disinfectant.
- Vodka. It’s not sufficiently strong to destroy coronavirus pathogens. Save it for a martini; don’t use it to clean.
Other Hygiene Tips
The CDC has a page of tips for keeping your home, and therefor, an RV, safe. It includes tips for maintaining a safe home when someone living there has Covid-19.
After cleaning and disposing of gloves, always wash your hands with soap and water for 20 seconds. Washing hands frequently and keeping them away from your face is recommended.
The CDC suggests using plastic covers for electronics if they are available.
If you use cloth towels to apply or wipe down disinfectants, wash them with your laundry. Use the hottest water setting appropriate for the load.
Disinfecting Your Motorhome Cockpit and Tow Vehicle Interior
Written by Matt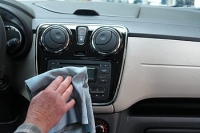
For RVers still on the road, it’s important to keep the cockpit of your motorhome or tow vehicle disinfected during the coronavirus pandemic.
True, many states have stay-at-home orders in effect. But thousands of RVers live full-time in their RVs. Many thousands more who routinely hit the road for much of the year probably headed out before extent of the pandemic was revealed. Even as states reopen, following best practices to fight the spread of pathogens that cause the Covid-19is advisable.
Paramount are properly disinfecting your hands and your vehicle interior.
It’s not necessary to wear a mask when you’re inside your vehicle, but put one on before going into a store or to a gas pump, and wear disposable gloves. A mask protects you a bit more and everyone around you much more.
For tips on keeping your RV living area free of coronavirus pathogens, see our companion piece.
Pumping Fuel
Perhaps nothing you touch as an RVer is more likely than a fuel pump handle to be touched by many other people. That means it could contain coronavirus pathogens.
Consumer Reports suggests that you wear disposable gloves when handling a fuel pump, either gas or diesel. You might be thinking, Well, I always wear gloves when I pump diesel. If you store those gloves away after refueling and wear them again the next time you pump, that’s not a good idea right now.
Gloves that touch a contaminated pump handle or contaminated pump buttons may pick up pathogens and retain them. How long? Reuters reports that the National Institute of Allergies and Infectious Diseases found that coronavirus pathogens could last several hours to several days, depending on the surface. Disposable gloves can help to counteract that threat. During the pandemic, cover your hands with disposable gloves when pumping.
Disposable gloves aren’t easy to come by right now. If you can’t get them, try using two plastic food storage bags over your hands and properly dispose of them the same as you would gloves.
Clean your hands before getting back into your vehicle with a hand disinfectant. That way, you’re more nearly certain not to deposit pathogens on interior surfaces. If you cant find hand disinfectant, keep soap—either bar soap or soft—plus a spray bottle of water and some paper towels handy, and wash for 20 seconds before getting back in your vehicle. Put them in a small caddy so you can place them on or beside your vehicle for easy access before you get back in. Dispose of used paper towels or wipes immediately.
Disinfecting Automotive Interiors
Disinfecting the cockpit of your motorhome or tow vehicle requires the most attention during actual travel. It’s where you’re most likely to deposit pathogens from your hands as you re-enter after stopping for fuel, food or bathroom breaks. Food has not been found to be a transmitter of pathoens.
Wear disposable gloves to disinfect an interior, then wash your hands for 20 seconds with soap and water after you dispose of the gloves.
Do use:
- Disinfectant wipes that do not contain bleach. Use on hard surfaces, especially the steering wheel. Also use them to clean door handles, armrests, control switches and buttons, displays screens, shift levers and paddles, seat belt buckles and the instrument panel cover.
- Disinfectant, such as Lysol, sprayed onto a paper towel. Apply it to the items above.
- Alcohol solutions containing at least 70 percent isopropyl alcohol. They can be used on just about any interior surface, but be warned that keeping alcohol in the vehicle interior is not recommended, since high temperatures may cause alcohol to boil.
- Soap and water, including dishwasher liquid diluted by water. As noted above for hand washing, soap breaks down the protective covering on coronavirus pathogens. It can do the same on interior surfaces, but it will require some scrubbing—not too much— with a towel or sponge. Rinse with a towel soaked in clear water. Along with dedicated leather cleaners, Ivory soap and water is recommended for leather, followed by a leather conditioner.
Do Not Use
- Bleach. It can weaken plastic surfaces, making them soft, and can permanently discolor fabrics and other porous materials.
- Hydrogen peroxide. The reasons are the same as for bleach.
- Ammonia or cleaners that contain it, such as blue window cleaner. Ammonia is OK on windows if you’re careful about applying it. Spray onto a paper towel, not onto the window, to avoid excess spray. Ammonia will break down the surfaces of plastics, and it can damage touch screens.
Wash Hands Frequently
The CDC recommends washing your hands frequently, 20 seconds each time, with soap and water. Keep your hands from your face as much as possible, even if you touched only a disinfected surface. Launder cleaning cloths with other laundry, using the hottest setting appropriate for the load. Dispose of paper towels and sponges, which may trap germs.
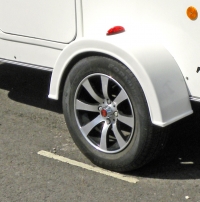
Don’t undersell the importance of the trailer tires you choose. It all rides on those tires—quite literally.
A blowout not only causes a handling hazard, it can damage a trailer as the shredded tire carcass whips against bodywork.
Never use passenger tires on a trailer. They are usually rated Load Range B, a 4-ply equivalent, because their sidewalls are flexible for a smooth ride—far too flexible for trailer duty. They are not engineered to stabilize heavy loads or to handle the temperatures that build with them.
ST, or Special Trailer, tires are intended only for trailers. ST tires must never go on drive or steer wheels. Their stiffer sidewalls are engineered to handle the tall loads of a travel trailer or fifth wheel on straights and in turns but not the stresses generated by steering and acceleration. They are at least Load Range C, which means the sidewall is rated 6 plies.
Lately some trailer owners—and even manufacturers—are equipping trailers with LT, or Light Truck, tires.
How Good Are Standard Tires?
American RV manufacturers, except some making compacts and popups with wheels smaller than 13 inches, equip each new trailer with radials. You can run bias ply tires on your camper and radials on your tow vehicle, but you cannot mix bias and radial tires on the trailer itself. Bias plies are cheaper but have a shorter life and get lower fuel mileage.
Don’t expect top-of-the-line tires on any but upscale models of travel trailers and fifth wheels. Some builders offer better tires as an option. Economy trailers and the increasingly popular light travel trailers usually have basic ST tires. They will have load capacities suitable for the loaded trailer, but they probably are rated 65 mph. Better ST tires are speed rated M, to 81 mph.
You can replace the standard tires with STs that have a greater load range, such as D or E. That would at least improve your trailer tires’ resistance to heat, a major cause of tire failure from the inside out.
Most trailer tires, especially the more affordable, are made in China. Shop carefully. If you’ve heard the expression “China bombs,” it’s a reference to cheap Chinese trailer tires that tend to blow out. For a while, Chinese-made LT tires and high-performance passenger tires had the same problem. Although some Chinese tires are poorly constructed, others are better built—and cost more. Many U.S. brands also are made in China.
Read the tire reviews, not just the publicity write-ups. Owners who’ve experienced product failure typically don’t shy from writing about it.
Are LT Tires Safe for Trailer Use?
LT tires are intended for vehicles that generate stress with heavy loads—pickups, commercial vans, and heavier SUVs. Their stability makes them ideal for mounting on a tow vehicle. Over the last couple of years, some camper trailer makers, including high-end manufacturer Airstream, have offered LT tires as an option. Some trailer builders have even made LTs standard.
ST tires and LTs differ. The truck tires have a higher top speed, typically to 100 (speed rating Q) or 106 (R). You may or may not want to haul a trailer at 75 mph, but the higher top-speed rating usually means a tire better resists heat buildup. Remember, heat is a tire’s enemy.
Another difference is maximum inflation pressure. An LT tire likely has a lower maximum pressure than a similarly sized ST. Any tire pressure sticker on your trailer wouldn’t apply to LTs. If you go with LTs, inflate to the maximum pressure embossed on the sidewall. Avoid over or under inflating, and don’t overload your trailer.
Buying a higher load range stiffens a sidewall, so an LT tire with Load Range D, E or F is advisable on heavier trailers.
The farther into the alphabet the letter designation goes, the stronger the sidewall. Most passenger tires are Load Range B, but trailer and truck tires go higher.
Most tires have two-ply polyester cord sidewalls, and some are three-ply. Not all plies are the same. Plies are sheets of rubber encasing fabric threads that are twisted into strong strands, or cords. Depending on weight and thickness, those plies may be intended for lighter duty, as on a car, or for handling heavier loads, as on a truck.
Decades ago, the number of plies would increase on truck tires, sometimes to 10 or even 12. The letters used for load range today are intended to represent stiffness equal to multiple plies, not the actual number of plies:

If You Switch to LT
Make sure an LT’s load capacity—for example, the number 125 in the tire size 275/70R18, 125R, E—is equal to or greater than what the trailer manufacturer specifies. LT tires typically have a significantly higher load capacity than passenger tires but a lower load capacity than ST tires. The 125 indicates a load capacity of 3,640 pounds per tire. Consult a load capacity chart. Also check to see that the trailer wheels can handle the maximum pressure.
Don’t forget to add an LT spare. You shouldn’t mix LTs and STs on the same trailer. Also check your warranty and insurance policies to make sure the change would not negate coverage. As always, check tires before every trip and keep them properly inflated.

Some RVers think of rubber roofs as inferior to aluminum or fiberglass roofs, but the simple fact is that most RVs hve one, and a rubber roof can last for 20 years or longer—if it is properly maintained. Of course, maintenance is up to you, the owner.
Periodic maintenance performed on the rubber roof membrane helps to protect the wood roof panels beneath it and the interior of your RV from leaks. Spring is a good time to check your rubber roof for damage, clean it and seal leaks.
If the roof is beyond repair, spring also is a good time to replace one. That’s a labor-intensive job that you may want to leave to a pro, but be warned: Rubber roof replacement, including the membrane and damaged wood panels underneath, can cost $4,000 to $10,000, depending on where you have the work done and the size of your rig. Get competing, detailed estimates before agreeing to have the work done.
Repairs are affordable, especially if you handle them yourself. Whether you do may depend on how capable you are of working on the roof and a ladder, and how comfortable you are with doing that. You can repair spots that have been torn or gouged, or you can replace sections.
Types of Rubber Roofs
Two types of rubber roofing are used on RVs:
- EDPM, or ethylene propylene diene monomer
- TPO, or thermoplastic polyolefin
Your RV owner’s manual should tell you which kind your RV has, and how to care for it. If the manual is missing, call the customer service number for the RV manufacturer and give the service rep your serial number. The manufacturer should be able to tell you what is covering your roof.
Cleaning a Rubber Roof
Sweep the debris from your roof.
Now inspect. Look for cracks, tears and gouges. Inspect not just the roof membrane, but also the sealant around anything that juts through the roof membrane, including fans, vents, skylights, air-conditioning units and electronics.
Before you wash the roof, use vinyl tape to temporarily seal leaks you uncover.
There’ one other important step before you wash the roof: Wash, or at least rinse with a hose or pressure washer, the vertical areas of the RV first, including the front, back and sides. That prevents hard-to-remove streaks on the vertical areas that runoff from the dirty roof might create.
Use a mild soap, such as Murphy’s Oil Soap, or a dedicated RV rubber roof cleane, mixed with water. Do not use a cleaner containing petroleum distillates, citrus or abrasives, all of which can damage rubber membranes. Scrub using a sponge mop or medium-bristle brush on a long handle. If your roof is not meant to be walked on, walk or stand on pieces of plywood that you lay atop the roof.
Rinse with a garden hose, or better, a pressure washer, set to no more than 1,200 pounds per square inch. Higher pressure could damage the roof membrane.
Patching Rubber Membranes
For gouges, tears and cracks, often caused by tree limbs scraping or striking the surface, cut away any loose rubber from the clean, damaged area of the rubber membrane using a utility knife and a scraper. Be careful not to cause more damage to the plywood beneath the membrane. The membrane is glued to the plywood, so a flat-blade scraper may be needed to carefully remove damaged sections of the rubber.
If the plywood is gouged, fill the damaged area with Dicor self-leveling sealant and allow it to cure. Do not use a silicone sealant because roof coatings and patches will not stick to it.
The wounded area, now enlarged, will need to be covered and sealed. Use Eternabond tapes or patches, or a similar product, and cut to size with scissors, generously but not excessively overlapping sound parts of the membrane around the wound. Eternabond and similar products have a sticky side that goes against the old membrane and plywood. They come in various widths and lengths. Keep leftovers for on-the-road repairs after mishaps with trees. Warning: Patching tapes won’t budge once in place, so align patches carefully and roll them out as flat as possible. If the tape has a protective layer on the outer surface, pull it back and discard it.
Smooth the patch by hand, then roll air pockets and loose areas flat, using a small roller, such as a wallpaper roller. Start in the center of the patch and work your way out.
Apply Dicor self-leveling sealant to the edges of the patch a maximum-strength seal against water. While you have your Dicor in hand, patch any cracked or leaky beads around roof-mounted accessories, such as fan and vent openings.
Sealing the Roof
Finish off your roof repairs and maintenance by coating the entire roof with a rubber roof-compatible sealant, such as Heng’s Rubber Roof Coating or 303 Protectant. Apply according to directions, typically with a paint-type roller and long handle. The sealant will make the roof even more waterproof. Just as importantly, the sealcoat will protect the membrane from the sunlight’s ultraviolet rays, which can dry and crack a membrane over time.
Check your roof periodically and do spot repairs as needed. A roof gets dirty nd dusty, so wash it at least one additional time during the season and before storing your rig.
It’s not unusual when driving in mountainous areas during winter to see a sign warning that chains are required. That’s a sign you don’t want to ignore—first, because it’s dangerous to proceed without them, and second, because you’ll get fined if you’re caught without the chains. The fines can be a lot deeper than the snow.
What exactly do you need to meet these requirements? Chains are proven effective on packed snow and ice, but these days other products also can effectively increase traction and satisfy authorities as chain alternatives. Check online for the rules of the highway department in the state you intend to visit, or of national and state parks that often post chain requirements.
Whichever you choose, you’ll be limited to 30 miles per hour, or maybe just 20 or 25, depending on the device. Given the conditions of snow- and ice-bound roads, it’s not likely you’ll need to go faster.
Let’s take a look at what traction devices will keep you and your RV safe and out of a legal quagmire.
Chains
Link-type chains are, without question, a safe and legitimate traction multiplier in deep snow and on packed snow and ice for tow vehicles, trailers and motorhomes. They do have some negative aspects. Link chains are:
- Heavy—not good if you’re trying to keep weight down.
- Easily tangled in storage, requiring untangling before installation.
- Harder to install than some newer traction devices.
Watch a video on installing link chains or cable chains.
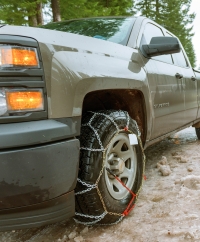
Vehicles with minimum clearance between the tire tread and wheel well—just under 1.5 inches— should use Class S chains. Chains that meet Class S requirements are Z-Chain, Super Z LT, Radial Chain, and Quik Grip PL.
Chains, like all traction devices for tires, must be placed on the drive wheels but can be placed on other wheels as well—on trailer tires, for instance, or on non-drive front tires. On motorhomes and tow vehicles with dualies, chains go on the outermost drive tires. On 4- and all-wheel-drive vehicles, chains should be installed at all four corners.
Before installation, most link tire chains look like a tiny ladder, with long sidewall chains running parallel to each other and cross chains linking them, sometimes on a diagonal. Once chains are draped over a tire, the cross chains run from one edge of the tread to the other. The sidewall chains align with each sidewall to form a roughly circular shape and help pull the chains tight.
Install chains on level ground. Once chains are draped on the tires, drive forward or back about 18 inches so the ends of the sidewall chains can be hooked together on the inner and outer sides of the tire. If the chains have tightening hardware, use a tool to tighten them. On chains without tightening hardware, use a bungee cord in a circular shape, with hooks that intermittently attach to the sidewall chains to tighten everything, or a ready-made tensioner that does the same thing. Premade tensioners are available even in sizes to fit a large Class A RVs.
Don’t fail to tighten chains. Loose chains are not only ineffective, but also a threat to the bodywork of your RV or tow vehicle, and to the wheels.
Easier to use but sill quite effective are cable chains. They are lighter, tangle less easily, tighten with less effort and sometimes install without having to move the vehicle. Cable chains with a diagonal pattern are actually recommended for trailers because the diagonals provide much more sway control than ladder types, which are better for accelerating and stopping.
Traction Straps
For similar performance without the hassle of chains, consider tire traction straps. Each strap performs like a cross piece on chains, running across the tire tread to bite snow and ice.
Usually made of a textured, solid nylon, the traction part of the device has nylon straps on each end and a buckle or fastener. The straps run around the tread and sidewall, passing through holes in the wheels. This design often allows installation without moving the RV or tow vehicle.
Some traction straps have link chains that lie against the tread, with tightening straps that go through holes in the wheels to hook together and tighten.
Traction straps come in different shapes and sizes, so you can find a size to fit your tires. Bigger traction straps will do better in mud and deep snow. Keep in mind that the bigger the device, the rougher the ride and the more clearance will be needed between the device and wheel well.
Snow Socks
If you’ve ever spent time in the snow wearing a knit cap or mittens, you’ve seen how snow sticks to the cloth. Snow socks, developed in Scandanavia, work the same way once they’re wrapped around a tire. These textile donuts, open only on the inner side of the tire to allow installation, use that adhesive property to grab the surface of snow and ice to generate traction.
That may sound like fairytale logic, but snow socks really do work. And the more they soak up water, the better the traction. Some also get “hairier” with use, which in turn increases grip. In addition to being lightweight, snow socks install without tools. They do, however, require moving the vehicle a few inches the same as chains do to complete installation, and stretching the socks over a cold tire takes some work.
What is not required is mechanical tightening. Snow socks are purchased in a size to fit your tires. The socks center themselves on the tire as the tire rolls.
In addition to weighing little and requiring light effort to install, snow socks result in a better ride quality than chains or straps.
Use Caution
Adventurous souls may scoff at the notion that snow should slow them down, but if roads are so hazardous that chains are required, you may want to think twice about proceeding. That goes double if you’re inexperienced driving your RV in snow.
Consider rescheduling your drive—a week, a few days or even a few hours—if conditions require or suggest the use of traction devices.
More...

Rats! Something is chewing the wiring on RVs, tow vehicles and dinghies!
Yes, rats, quite literally—or more likely mice, and maybe squirrels, rabbits or groundhogs.
The wire-chewing problem appears to have reached epidemic proportions. Ask any insurance agent and you’ll hear that claims for chewed wiring are rising. Online reports of damage are widespread. One woman complained to the National Highway Traffic Safety Administration that when she turned on her car’s air conditioner, mouse fragments rattled around the box fan and flew everywhere through the vents, including all over her. One Toyota Tundra owner has sued Toyota over repeat episodes of rodent damage to under-hood components.
Comprehensive insurance usually covers the damage, but owners are left covering deductibles that can reach $1,000 or more, depending on the policy, and they lose the use of their vehicles until repairs are completed.
A Matter of Taste
Rodent damage is nothing new, of course. Mice have always found a way to squeeze through the tiniest opening—or chew their way through anything but stainless steel—to reach any food not placed in a sealed container.
But that was all kinds of food. What has made rodent tastes go from eclectic to electric? Why have vehicles become all-you-can-eat buffets for rodents?
They’re attracted by the new coatings on automotive wiring. Once protected by a rubber-based product, and then by petroleum-based plastics, the wires are now increasingly encased in a more environmentally friendly soy-based sheathing.
And rodents love it. To them, it’s food. Automotive wiring manufacturers might as well have posted blinking neon signs in driveways and campsites that say “Mouse Diner This Exit.”
What Can You Do?
Short of poison, it is possible to keep rodents from wiring, but it’s not always easy.
Avoid resorting to poison. It can work, but it presents dangers to people and pets. The rodent doesn’t die where it eats the poison, but instead where it is when the poison takes effect. That could be inside a wall or air duct, where the odor can linger for weeks. In ductwork, it will not only smell, but also can spread the poison through air conditioning and heating.
If a pet eats a poisoned rodent—lying in a corner of your coach or on the ground outside—the pet is poisoned, too.
It’s a better practice to keep rodents away from the wiring.
Here are some things that can help:
- Have metal screening installed around wiring under the hood of vehicles, and over vent openings. Screen is cheap, but the labor to install it may run into hundreds of dollars.
- Wrap wires with an electrical tape that repels rodents. Honda 4019-2317 electrical tape is infused with capsaicin, a hot spice that will convince a mouse to dine elsewhere. You can install it yourself when the engine is turned off and cool.
- Spray wires with a rodent repellent, such as Rodent Defense or Natural Armor Vehicle and Engine Protection. They don’t kill rodents, just ward them off.
- Mouse Free is a spray applied to the underside of any vehicle with a compressed air sprayer before and after winter storage. It contains natural oils, including peppermint, which rodents hate. It’s not cheap, costing a bit over $100 for a gallon and sprayer. Refills are around $35.
- To catch mice, set snap traps around tires when your RV, tow vehicle and dinghy are parked. You’ll need three traps per wheel—one in front, one in back and one on top. That means 12 to 18 for a tow vehicle or motorhome, six to 12 for a travel trailer and 6 more for your dinghy.
- Plug any holes in your RV, preferably with steel wool, which mice can’t chew.
If you’re an RV owner who experiences a tire blowout at highway speed, it probably scared you about as much as anything in your life. Even experienced drivers fear the sudden loss of pressure in a tire because of the vehicle control it takes away.
It is possible, however, to control a vehicle when a tire blows—even at speed—if you know what to do. Ironically, doing what you think is right is not always the answer.
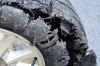
How Do Blowouts Occur?
Blowouts aren’t nearly as common today as years ago when tires had tubes. In those days, once the inner tube was breached, pressure loss was immediate and critical—often deadly.
Tubeless tires blow out less often, but it still happens. So do garden-variety flat tires, which remain hazardous, especially on highways with high speed limits and heavy traffic. According to the National Highway Traffic Safety Administration, tire-related problems, including flats and blowouts, caused 738 fatal accidents in 2017, the latest statistic available.
Blowouts occur because of sudden tire failure, sometimes from factors that build up over time. That can be over months, hours or, unfortunately, minutes. Resulting problems can be ply separations, tread disintegration, sidewall fatigue, failure of the bladder (which holds air in the tire), or leaks in the valve or valve stem.
When a Tire Blows at Speed
The best thing to do when a tire fails while you’re driving an RV is counterintuitive. It’s all about physics—about real science, not gut feelings. Don’t hit the brakes or immediately slow down, reactions that many people believe are best. Instead, press the accelerator to maintain or, if possible, increase speed.
A flat tire will slow your RV, but with somewhat erratic control as it exerts a force to whatever side has the flat. So, for example, if a right tire blows—either front or rear—you’ll feel a pull to the right. You’ll sense a rear-tire failure in your seat; you’ll feel a front-tire failure in a stammering message from your steering wheel.
A study done by leading tire maker Michelin for the Recreational Vehicle Industry Association with a lesson placed on video shows that accelerating allows the forward force of the RV to better overcome the sideways force. You’ll have to make a lot of steering corrections to maintain control—you’ll really wrestle with the wheel. Once you reach a safe place to pull over, signal and gradually slow and steer to the side of the road. There, you can change the tire yourself or call for a service truck.
How To Avoid Blowouts
It’s best to avoid blowouts in the first place. The leading causes of blowouts are overloads and under inflation. Don’t overload your RV. Don’t underinflate your tires—or overinflate, either.
There’s no guarantee that you’ll never experience a blowout, but doing these things will help to avoid one:
- Buy quality tires. Search online for reviews of any tire brand and model you’re considering. Make sure it’s a real review, not just praise trumped up by a tire dealer trying to make a sale. Also check the NHTSA for recalls and complaints.
- Look at ply ratings. Most tires have two or three sidewall plies, but those for heavier vehicles and trailers have higher ply ratings indicating more sidewall strength. Load Range B is merely two plies and impractical for trailers, tow vehicles or motorhomes. Load Range C is a 4-ply rating and still often inadequate for the stresses of heavy loads. Better are Load Range D (6 ply-rating), E (8-ply rating) or F (10-ply rating).
- Make sure your tires are rated for proper load. Consult a standard load table. Check your load per axle on a truck scale. Evenly distribute weight as much as possible. And remember: Full tanks add hundreds of pounds to your load.
- Check your tire pressure before a trip—and every morning.
- Inflate to the manufacturer’s recommended pressure. Remember that driving in high altitudes may require extra air, since pressure in the tire will drop as you climb.
- Maintain your tires. Rotate them at least annually, or every six months. Maintain proper pressure. Make sure tires are balanced.
- When you’re parked, use covers to shield tires from degradation caused by the sun’s UV rays, especially in the Sun Belt.
Take your time, particularly if you’re not overly experienced at driving or towing an RV. If you’re going a little slower when a tire blows—55 or 60 mph instead of 75—reacting to it will be easier. And keep a longer distance between you and the vehicle ahead of you, which gives you an opportunity to accelerate in the event of a blowout.
Photo Credits: Flickr.com

Motorcycles are a valid local transportation alternative to four-down towing.
Dinghy towing is becoming more popular but also more difficult in one respect: Many models that could be towed four-down years earlier are no longer eligible because of changes in equipment, often a switch to continuously variable transmissions or different transfer cases.
Motorcycles can be towed behind or mounted to motorhomes, and they can be tucked into toy hauler trailers. Although they can’t be towed behind or mounted to the rear of a travel trailer, they can be mounted to the tow vehicle in some cases or secured in the bed of a pickup.
A motorcycle can get you into town for supplies if you equip it with cargo accessories. It can easily transport you, and probably a companion, to a movie or restaurant. And if it’s a dirt bike, it can also take you exploring while you’re boondocking, at least where motorcycles are allowed. And of course it will deliver better mileage than most cars or SUVs. The disadvantage is that bikes aren’t the best choice for foul-weather travel or, for some folks, long distances.
Helmet laws vary by state, so make sure that as you travel, you know where a helmet is required.
Motorcycle Hitch Mounts
A hitch mount works fine on a motorhome. Think of it as a giant bicycle rack. It fits into the female receiver tube on the back of the motorhome.
It can also fit onto the hitch of a tow vehicle. Now, you’re probably thinking, “Great. I can mount a motorcycle carrier to the tow vehicle hitch, but then I can’t pull a trailer.” Some motorcycle carriers, such as the Versa Haul Sport, have trailer hitches of their own that extend off the back of the motorcycle carrier. The hitch on the VH Sport can tow trailers up to 3,000 pounds.
Motorcycle hitch mounts tilt or have a ramp to allow the bike to be placed on the rack. Make sure you like the arrangement on the hitch you buy.
Not all motorcycle hitch mounts are alike. Some things to consider:
- Capacity. Some carriers can support bikes weighing up to 800 pounds, others less. Know your bike’s weight and the carrier’s capacity.
- Tire width accommodation. Not all motorcycle hitch mounts can accommodate wide tires on sportier bikes.
- Materials. Some carriers are steel; some are aluminum, which weighs less and doesn’t rust.
- Hitch compatibility. Know which class hitch is on your vehicle and whether its receiver tube accepts the male connector on the carrier.
- Trailer compatibility. If you want to tow a trailer and carry a bike on a hitch mount, make sure the bike hitch can accommodate a trailer as well, and know the maximum trailer weight allowed.
Another type of trailer hitch mount is a carrier rack, which places the front motorcycle wheel off the ground and lets the rear tire roll on the road. These carrier racks will attach to motorhome hitches for considerable savings compared to mounts that have both wheels off the ground. Most manual-transmission bikes can be towed this way, but check your owner’s manual.
Bedtime
If you use a pickup to tow a trailer, you can often secure a bike—or two—in the bed of the pickup. That’s easiest with an 8-foot bed, but a 6-foot bed will often suffice. You’ll need strong ratchet straps that you can attach to cargo hooks in the bed, and wheel chocks.
If you lack the necessary tie-downs, there are brackets that attach permanently to your bed and can help, such as the Bed Buddy brace. You’ll also need a ramp that you buy or make. Follow these instructions on securing motorcycles in a pickup bed.
One caution: Make sure the tongue weight of your loaded trailer, plus the weight of passengers and your bikes, does not exceed the maximum payload of your truck.
Motorcycle Trailers
Motorcycle trailers, depending on the model, will accommodate one or two motorcycles behind a motorhome. Uncovered doubles typically cost $2,000 to $3,000, and singles, $1,000 to $2,000. They provide the support your bike will need to be towed securely.
For an enclosed cargo trailer that accommodates two bikes, figure on about $3,500 or more. Enclosed trailers, although higher priced, protect your bikes from weather and grime, and provide security.
And if you’re not ready to buy a trailer? You can rent one, giving you a chance to try out towing a bike.
Photo Credits: Wikimedia Commons/Jeffrey M. Dean

Smaller RVs are becoming more popular as RV ownership hits new heights and attracts younger buyers.
With Millennials and Gen Xers now making up more than half of all RV owners, a trend toward small RVs make sense. Small RVs usually cost less, and younger buyers tend to have smaller bank accounts. Smaller RVs also are easier on the environment, which many progressive Millennials value.
Manufacturers Adapt
The Recreational Vehicle Industry Association explains that manufacturers have adapted to demands from new camping enthusiasts. “RV manufacturers are offering innovative new products that offer an optimal mix of size, amenities and price for today’s budget-conscious consumers,” RVIA reports. “Manufacturers are producing lightweight trailers and smaller, fuel-efficient motorhomes.”
RVs of all sizes are becoming more environmentally friendly, RVIA says. “Green technologies such as solar panels and energy-efficient components are appearing on an increasing number of RV models,” RVIA notes.
It doesn’t take a full-size V8 pickup to pull a small trailer. A compact pickup, a midsize SUV, crossover, and some sedans can pull many pop-ups, teardrops and compact trailers. The shift to small SUVs is undeniable—so much so that Ford is phasing out all cars but the Mustang sport coupe, with the rest of its vehicles to be SUVs and trucks of varying sizes.
Small RVs, because of design innovation, aren’t as cramped as they used to be.
Pop-Ups Look Like Home Runs
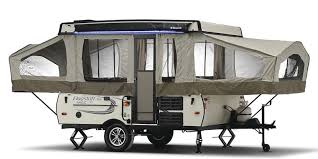 A pop-up trailer with tent sides and zippered windows, with a fiberglass roof that lifts up from the body, remains one of the cheapest tickets to trailer camping. For example, the Forest River 206LTD costs less than $7,500. It has central heat but not air, a roomy kitchen with under-counter refrigerator and adequate cabinetry, plus a clever carryout stove for outdoor cooking; foldout double and queen beds under canvas-covered bump-outs, plus a convertible dinette that sleeps two; stand-up headroom; and a 9-foot awning. The shower is on the exterior.
More protective are new “A” frame pop-ups with hard sides. In Forest River’s Flagstaff Hard Side, you see an awful lot of features and livability. At 2,600 pounds or less, it’s 21 feet long. There’s stand-up headroom; a heat pump; kitchen with 3-burner cooktop, sink, midsize refrigerator and cabinetry; sleeping capacity of four; a dining area; speakers inside and out; toilet; choice of inside or outside shower; and an awning.
Small Trailers Bring Real Comfort
Compact travel trailers have less floor space than a 35-footer, but they’re easier to tow, surprisingly spacious, and feature-rich, with standup headroom.
The Keystone Bullet Colt, for example, is 20 feet long and weighs about 3,000 pounds. It sleeps three or four in a queen bed and convertible dinette. The kitchen has a generously sized stainless steel fridge, two-burner cooktop, microwave and plenty of cabinet space. The bath is wet or has a curtained shower. Even a slideout is available. All Bullet Colts have pass-through storage. Buyers typically pay less than $20,000.
So Many Teardrops
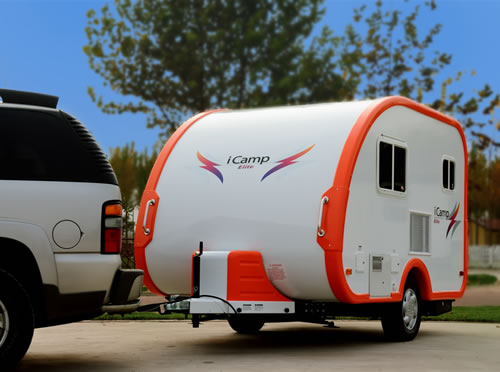 A staple of the 1930s and 1940s, teardrops never were quipped the way they are today. For campers accustomed to sleeping in tents, a teardrop is a nice step up. You know you’re still roughing it a bit when a teardrop has an exterior shower and a kitchen under a rear tailgate. The 14-foot iCamp Elite, however, is more refined, with a wet bath, full kitchen and dinette inside. It can sleep three. Some teardrops pop up for more headroom, then lower for more streamlined towing, and some have a manual slideout that expands space.
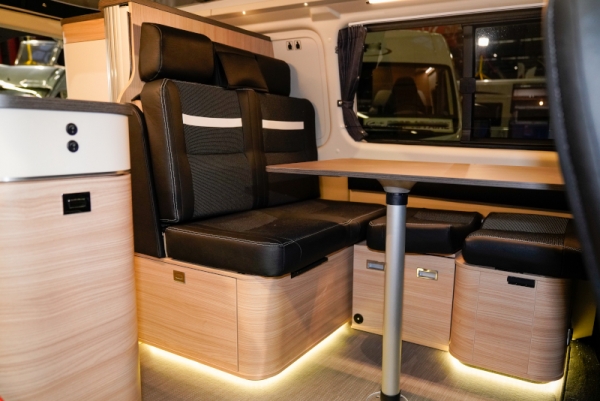
Class B Motorhomes
Built on extended gasoline- or diesel-powered work van chassis, Class B motorhomes offer just about everything a Class C offers, except the space. You’ll typically find dedicated beds, full kitchens, a TV, air-conditioning, sleeper dinettes, baths and awnings. Smart design, such as fold-up Murphy beds, expand living space.
A Class B isn’t cheap. A Winnebago Travato built on a Ram Promaster chassis sells for about $100,000 and up. Campers on a Mercedes four-wheel-drive platform may go as high as $250,000. A Class B is easy to drive—it would even get you to work in a pinch. It’s great for weekend getaways, including football games and tailgates.

“RV owners overwhelmingly said in recent surveys that their RVs make it easier to take more frequent weekend getaways or mini-vacations that accommodate busy family schedules,” RVIA noted. Without the need to hitch a trailer, a Class B can be especially attractive to those campers.
Photo Credits: winnebagoind.com, urvusa.com, keystonerv.com, forestriverinc.com