Welcome to Crossing Creeks RV Resort & Spa in the heart of iconic Blairsville

Matt
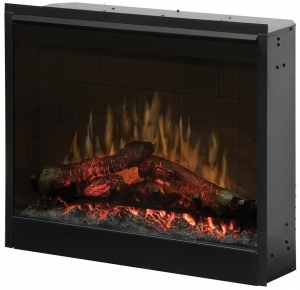
Fireplaces for Your RV
Furnaces keep you warm inside your RV on cool nights—and cold ones—but they’re not much to look at. Don’t hold your breath waiting for a fellow RVer to say, “Hey, you really need to see our heat vents. They’re just beautiful.”
Not gonna happen. Now, a fireplace—that’s a different story. A fireplace can be attractive on its own, offer a lovely view of flames, and throw a lot of heat.
A heat source that’s nice to look at is always welcome, and that’s what an electric or propane fireplace is. (If you want a rundown on woodstoves, see our earlier blog.)
Safety
When done right, a retrofitted RV propane or electric fireplace installation is just as safe as an original equipment, built-in fireplace. It may be safer than a freestanding propane space heater because it won’t accidentally tip over.
It’s imperative that the installation follows manufacturer’s specifications for clearance and ventilation. Recommended gaps between the fireplace and surfaces must be maintained, and in the case of a propane fireplace, a nonflammable wall barrier may have to be installed.
On electric fireplaces, look for a proximity detector. If it senses an object too close, it shuts down the fireplace to prevent fire.
With a propane fireplace, make sure you have a carbon monoxide detector and alarm low on a wall, plus a propane leak detector. Mount a smoke detector high on a wall or on the ceiling for either type of fireplace.
When looking for a space for an electric fireplace, try to find out from the RV manufacturer where the optional fireplace would have been installed had it been ordered with the RV. Usually the space is covered by a shallow cabinet. Remove the doors and maybe some material at the back of the cabinet and there’s probably a space for an electric fireplace. There also may be an electrical outlet already installed where the fireplace can be plugged in.
Choosing a Fuel
Fuel choice is largely personal, but it may be influenced by your RV lifestyle and whether you boondock often. It also can be influenced by the location you have for a fireplace, clearance around that space, and the size of your RV.
Electric and propane can be used under different circumstances (see below). The real flames that come with a propane unit may be enticing, or they may scare you. The simulated flames of an electric fireplace may satisfy your aesthetic sense or turn you off.
Both fuels are clean, but health issues are associated with unvented propane fireplaces. A vented fireplace, which burns outside air and exhausts gases through a vent or chimney, leaves indoor air healthier.
Propane
Pros:
- Clean operation.
- Can be used while boondocking.
- BTU rating often higher than on electric fireplace, heating bigger RVs.
- Real flames to view.
Cons:
- Can leave you without heat if you’re out of propane and have no electrical heater at campsite.
- Higher BTU output too much for some small RVs.
- More expensive to buy, install than electric.
- Can get hot in small spaces.
- Can use more propane than other appliances combined.
- May need more propane tanks to ensure adequate fuel supply.
- High humidity, resulting in mold, possible in unvented installations.
- Unhealthful air buildup in unvented installations.
- Cutting through RV exterior required for healthier vented installations.
Electric Fireplaces
Pros:
- Clean operation
- Cheaper to buy, install than propane fireplace.
- Cheaper to operate than propane unit.
- Arguably safer than propane because no flame or lethal gas; proximity sensor (if so equipped) shuts fireplace off if it detects objects too close.
- No need to cut through roof or wall because no chimney or fresh-air vent needed.
- No degradation of interior air.
- Can be used at campsite with hookup even if you’re out of propane.
- Easier DIY installation.
- Not too hot for smaller RVs.
- Color change of simulated flames on LED models.
Cons:
- Cannot be used while boondocking unless generator running.
- Produces fewer BTUs than bigger propane fireplaces, so may not heat bigger RV.
- No real flames; simulated flames produced by lights.
- Some flame simulations look cheesy.
- Some fans noisy.
- Artificial fire pops sound fake on some models.
Built-In or Surface Mount
Both gas fireplaces and electric models come in wall-mount or recessed styles. What you buy may depend on the space you have, clearance, and venting requirements, but as long as you follow the fireplace manufacturer’s recommendations, your choice should be a matter of preference.
Clearance requirements differ by manufacturer, model, BTU rating and fuel choice. In general terms, electric fireplaces need a half-inch to one inch clearance from combustible surfaces, but don’t assume: Follow the specs. Propane fireplaces are likely to need more clearance and a noncombustible lining between the fireplace and wall surfaces, and the flue pipe and surfaces.
A propane fireplace, even with wall liners, can look attractive. A good example is the 22-pound Dickinson Marine P9000. This 8.5x14x5.5-inch vented unit, designed for boats, is used frequently in RVs. It requires a stainless chimney, but the fireplace can be mounted at floor level if needed for proper draw. It also needs metal shielding on the wall adjacent to the firebox and flue pipe. The P9000 is stainless steel for a brighter look. Make sure you get the propane version, not the wood-burning solid fuel model. It’s rated up to 4,500 BTUs and can burn up to seven hours on a pound of propane. With liners and chimney, the whole setup probably costs $1,200 or less.
Electric fireplaces abound for RVs. Electric is what most RV manufacturers install. With no chimney or wall liner needed, you’re looking at $250-$500 in most cases. Figure on another $100 or so if you’re framing around it and trimming the enclosure out. You also may have electrical costs for wiring in and outlet. Still, it’s cheaper than a propane installation.
Photo Credits: rvupgradestore.com
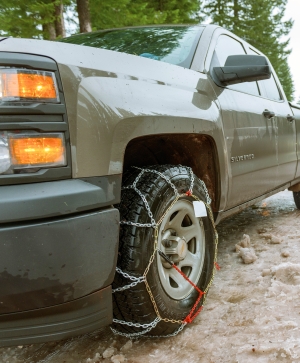
When Your RV Needs Traction Devices
It’s not unusual when driving in mountainous areas during winter to see a sign warning that chains are required. That’s a sign you don’t want to ignore—first, because it’s dangerous to proceed without them, and second, because you’ll get fined if you’re caught without the chains. The fines can be a lot deeper than the snow.
What exactly do you need to meet these requirements? Chains are proven effective on packed snow and ice, but these days other products also can effectively increase traction and satisfy authorities as chain alternatives. Check online for the rules of the highway department in the state you intend to visit, or of national and state parks that often post chain requirements.
Whichever you choose, you’ll be limited to 30 miles per hour, or maybe just 20 or 25, depending on the device. Given the conditions of snow- and ice-bound roads, it’s not likely you’ll need to go faster.
Let’s take a look at what traction devices will keep you and your RV safe and out of a legal quagmire.
Chains
Link-type chains are, without question, a safe and legitimate traction multiplier in deep snow and on packed snow and ice for tow vehicles, trailers and motorhomes. They do have some negative aspects. Link chains are:
- Heavy—not good if you’re trying to keep weight down.
- Easily tangled in storage, requiring untangling before installation.
- Harder to install than some newer traction devices.
Watch a video on installing link chains or cable chains.
Vehicles with minimum clearance between the tire tread and wheel well—just under 1.5 inches— should use Class S chains. Chains that meet Class S requirements are Z-Chain, Super Z LT, Radial Chain, and Quik Grip PL.
Chains, like all traction devices for tires, must be placed on the drive wheels but can be placed on other wheels as well—on trailer tires, for instance, or on non-drive front tires. On motorhomes and tow vehicles with dualies, chains go on the outermost drive tires. On 4- and all-wheel-drive vehicles, chains should be installed at all four corners.
Before installation, most link tire chains look like a tiny ladder, with long sidewall chains running parallel to each other and cross chains linking them, sometimes on a diagonal. Once chains are draped over a tire, the cross chains run from one edge of the tread to the other. The sidewall chains align with each sidewall to form a roughly circular shape and help pull the chains tight.
Install chains on level ground. Once chains are draped on the tires, drive forward or back about 18 inches so the ends of the sidewall chains can be hooked together on the inner and outer sides of the tire. If the chains have tightening hardware, use a tool to tighten them. On chains without tightening hardware, use a bungee cord in a circular shape, with hooks that intermittently attach to the sidewall chains to tighten everything, or a ready-made tensioner that does the same thing. Premade tensioners are available even in sizes to fit a large Class A RVs.
Don’t fail to tighten chains. Loose chains are not only ineffective, but also a threat to the bodywork of your RV or tow vehicle, and to the wheels.
Easier to use but sill quite effective are cable chains. They are lighter, tangle less easily, tighten with less effort and sometimes install without having to move the vehicle. Cable chains with a diagonal pattern are actually recommended for trailers because the diagonals provide much more sway control than ladder types, which are better for accelerating and stopping.
Traction Straps
For similar performance without the hassle of chains, consider tire traction straps. Each strap performs like a cross piece on chains, running across the tire tread to bite snow and ice.
Usually made of a textured, solid nylon, the traction part of the device has nylon straps on each end and a buckle or fastener. The straps run around the tread and sidewall, passing through holes in the wheels. This design often allows installation without moving the RV or tow vehicle.
Some traction straps have link chains that lie against the tread, with tightening straps that go through holes in the wheels to hook together and tighten.
Traction straps come in different shapes and sizes, so you can find a size to fit your tires. Bigger traction straps will do better in mud and deep snow. Keep in mind that the bigger the device, the rougher the ride and the more clearance will be needed between the device and wheel well.
Snow Socks
If you’ve ever spent time in the snow wearing a knit cap or mittens, you’ve seen how snow sticks to the cloth. Snow socks, developed in Scandanavia, work the same way once they’re wrapped around a tire. These textile donuts, open only on the inner side of the tire to allow installation, use that adhesive property to grab the surface of snow and ice to generate traction.
That may sound like fairytale logic, but snow socks really do work. And the more they soak up water, the better the traction. Some also get “hairier” with use, which in turn increases grip. In addition to being lightweight, snow socks install without tools. They do, however, require moving the vehicle a few inches the same as chains do to complete installation, and stretching the socks over a cold tire takes some work.
What is not required is mechanical tightening. Snow socks are purchased in a size to fit your tires. The socks center themselves on the tire as the tire rolls.
In addition to weighing little and requiring light effort to install, snow socks result in a better ride quality than chains or straps.
Use Caution
Adventurous souls may scoff at the notion that snow should slow them down, but if roads are so hazardous that chains are required, you may want to think twice about proceeding. That goes double if you’re inexperienced driving your RV in snow.
Consider rescheduling your drive—a week, a few days or even a few hours—if conditions require or suggest the use of traction devices.
4 Helpful Gadgets for RVers

New things come along all the time aimed at the RV market. Some are worthless, some are obviously a great idea, and some prove themselves over time.
Let’s dwell on things that actually make sense. Some make work easier. Others make good times more fun. All are worth considering and can help you check off names on your holiday gift list.
Rapid Jack
A curved wedge made from recycled plastic, Rapid Jack from Andersen Hitches solves many a problem with having to install tire chains or change a trailer tire. It works with dualies and with twin-axle trailers. Rapid Jack is has a weight capacity of 20,000 pounds, despite weighing just 6 pounds itself.
Insert Rapid Jack under an inflated tire on one of two axles or a tire on a dually axle, then drive forward or back until you feel the vehicle lift. That gets the tire that’s flat or to receive chains off the ground. It’s easier than setting up a traditional jack and cranking it or pumping a lever. Laid on its side, it also can be used as a base for a hitch jack. Price: About $50.
Battery-Powered Impact Wrench
If you hand-crank four scissor jacks to stabilize you RV once you level it, you’ll save time and effort with a battery-powered impact wrench. It also saves wear on your back, hands and arms when changing a tire.
Only a few years ago, you needed compressed air to have a powerful impact wrench. Not today. Stronger batteries and powerful magnets make modern impact wrenches quite good. With the appearance of a squat drill-driver, an impact wrench has more power and more torque, and a collet, rather than a chuck, for holding bits and tools. Look for a wrench rated for at least 300 lb/ft of torque with an 18-20v battery. Make sure you’re getting the tool, battery and charger. Many recharge in less than an hour. The DeWalt Max XR throws in a bag—perfect for RV storage. You’ll have to pick up attachments that fit your jacks and wheel lugs. Price: $150-$350.
DJI Mavic Mini Drone
If you’ve thought about adding a drone to your RV toy box but shied away from $1,000—or higher—price tags, consider the DJI Mavic Mini quadcopter. It’s so lightweight that the FAA doesn’t even require you to register it. Its four fold-away motors and rotors propel it to speeds up to 25 mph. The built-in camera is mechanically stabilized on a 3-axis gimbal, the best way to ensure that video is shake-free. It’s capable of recording video in 2.7K high-definition—not the highest out there, but very good. Detailed stills are 12MP.
Mavic Mini can fly 2.5 miles away and stay aloft nearly half an hour. That’s stellar in a small, foldable drone. The included controller links to your smartphone so you can see what the drone does. Store and edit video and stills on your phone. Mavic Mini takes off and lands easily, and there are flight tutorials. Use Mavic Mini to scout ahead when you’re exploring, to preserve your activities, or to shoot creative selfies with the help of preprogrammed flight modes. DJI drones are known for dependability. Price: $399.
Walmart Atlas
A paper Atlas in 2020? Really? You bet.
You may scoff at a paper Atlas in the age of GPS, but it provides things at a glance that your GPS or cell phone just doesn’t. Maybe the most important thing is that an old-fashioned atlas works without power, so if you’re on the road, don’t know the area, and there’s no cell signal because a tower or power is absent, a paper Atlas is a valued companion.
A paper atlas also can give a bigger view than a tiny monitor or smartphone screen. That helps if a family is gathered at lunch or breakfast trying to figure the next leg or two of their journey. They’re likely to see more features than on a GPS map. The wider view also helps put things into perspective. The Walmart version shows the location of the chain’s stores and denotes where gasoline and/or diesel fuel is available. The stores also are probably sources of other necessities, including prescriptions, propane and firewood. And the paperback will store easily. So there! Stop sniggering. Price: $11-20.
Image Credits: Dronenerds.com
Flashlights for RVers

Portable lights are invaluable to RVers when hitting the trail, relaxing outside the RV, responding to emergencies and performing maintenance tasks.
Flashlights can do more than just light the way. Thy can also signal an emergency. And if they’re the right strength, shape, size and weight, they also can help with self-defense.
LED Bulbs
Today’s best flashlights have LED bulbs. LEDs are brighter and whiter than older halogen bulbs and far brighter than even older incandescents. They also are more shock resistant, so dropping one on the trail or while walking to camp facilities at night won’t kill your light.
Many LED flashlights have adjustable light settings. Batteries can last for weeks on a low setting and surprisingly long even on high beam. The bottom line: LEDs emit more light, particularly in groups of three, five or more, but use less energy than a single older bulb.
Battery Choices
Influencing your battery choice are your needs, budget and tolerance for the inconvenience of recharging or swapping out single-use batteries.
Most rechargeable flashlights with integrated batteries have lithium-ion units that charge in two to 10 hours. All other factors being equal, the higher the battery’s mAh rating (milliamp hours), the longer it will deliver power before needing to be recharged, and the more draw it can handle. Adding convenience is USB-cord recharging, allowing recharging from other devices, battery packs or vehicle ports.
You can still get flashlights that work on traditional disposable alkaline D cells (the big cylindrical batteries) and AA and AAA cells (smaller cylindrical batteries), or CR123A batteries. Those sizes also are available as rechargeable batteries, usually in nickel metal hydride, or NiMH, so you can buy a charger and recharge reusable batteries hundreds of times. Shop carefully for chargers. Some chargers will replenish four batteries in about an hour or less; others can take four hours or even longer. The Energizer 1-hour charger with 4 NiMH batteries is about $35.
Newer 18650 batteries also are rechargeable, often with 1,800 to 3,000 mAh ratings or higher to power a flashlight longer, and 3.7 volts of power. They power laptops, other electronics and even the Tesla rechargeable car—although a Tesla requires more than 7,000 of them. Seriously! Similar but smaller than the 18650 are 16340 batteries. $10-$25, depending on brand and capacity.
Both sizes can be purchased for a little extra money with built-in protection against overcharging and overheating. You can also buy an overcharge-protected charger. The Dottman Smart Universal Battery Charger can charge AA, AAA, 18650, 16340, CR123 and more sizes and guard against overcharging. About $35.
Let’s look at a few flashlights, and where and when they come in handy.
Tactical Flashlight
A tactical flashlight is tough and can take a pounding—or deliver one in self-defense. The Streamlite Stinger slips into a back pocket because it’s thin. Rubber over an aluminum body provides good grip and the polycarbonate lens is unbreakable. It has an adjustable beam and a 50,000-hour LED. It can shine up to 6¾ hours on low, 3½ on medium and 1¾ on high. The strobe can be used to disorient an assailant, or it can signal distress for 5½ hours. It’s water resistant and includes a charger. $100-$125.
Rechargeable Flashlight
The Goodsmann Submersible LED Spotlight Model 9924-H101-01 is versatile and powerful, with an astonishing 1,100-foot beam—more than a third of a football field. Its Cree LED lamp produces a blinding 3,000 lumens. The built-in battery is rated at up to 2,000 mAh, powering it up to 8.5 hours on low and up to 3 hours on high. A flashing emergency beacon has a runtime of up to 7.5 hours. A pistol-style handle makes it easy to hold, and a fold-down stand makes it a work light. It also floats. About $150.
Headlamp
Convenient for hiking, breaking down camp before daybreak or performing maintenance, a headlamp leaves your hands free. The rechargeable Black Diamond series can emit a beam rated at up to 300 lumens, with a low setting available. Runtime on high is up to 30 hours. It’s water resistant, so changing a tire or walking your dog in the rain won’t damage the lamp. $15 and up.
Traditional Flashlight
Flashlights with D, AA or AAA cells have been around for decades for one simple reason: They work. They have gone through many iterations. Most significant are the change in lamps from incandescent bubs to halogen and finally LEDs, and tougher cases. With the availability of rechargeable, removable batteries, they’re cheaper to operate. You can’t do much better than a Maglite ML300. It produces 1,000 lumens of light on 4 alkaline D-cell batteries and can run for 97 hours on low or 5¾ on high. Smaller Maglites also are available. $90-100.
Lantern
Two-hundred hours of use from one charge on a lantern is nothing to blink at, and that’s what the Tough Light Rechargeable Lantern delivers. Lanterns are great for campsites and completing work in dark corners of your RV or at night. Tough Light produces 400 lumens, adjustable to 200 lumens for the longer runtime. A white beacon shines for 265 hours, and a red hazard light for 526. The lantern is water resistant to 5 feet. About $65.
Would Private Management Solve U.S. Parks $12 Billion Maintenance Shortfall?

We all know the price that’s paid for deferred maintenance. You delay oil changes to save $60 and you need an engine rebuild for $4,000. You delay transmission fluid changes to save a couple of hundred bucks and you need a new tranny for $6,000. You avoid getting a roof leak fixed and you need—well, a new RV, for $20,000 or $40,000 or more.
Deferred maintenance is undeniably false economy.
Now think about something so many of us use and enjoy, the National Parks System. According to National Parks Service deferred maintenance reports, the agency has delayed nearly $12 billion in park maintenance—$313 million in fiscal year 2018 alone. The cumulative maintenance backlog includes $6.5 billion in roads and structures, and $5.77 billion in other facilities, such a campgrounds, fresh water systems, housing, utilities, dams, manmade waterways, marinas and more.
As quoted by nationalparkstraveler.org, Deny Galvin, a former deputy director of the National Park Service, told the House Federal Lands Subcommittee two years ago that most national parks facilities are more than 50 years old. Reed Watson, the executive director of the Property and Environment Research Center based in Bozeman, Montana, told the same committee that fees would need to increase to help cover costs if Congress continues to refuse a significant increase in appropriations.
RVIA, RVers Want Action
The Recreational Vehicle Association has noticed, and it has gone on record to urge the first major upgrade to national park facilities since the 1960s. (Yes, you read that decade right.) The RVIA says there’s an additional maintenance backlog topping $5 billion in National Forest Service lands.
RVIA said improvements are needed but added that it wants to see parks remain affordable to visitors.
RVIA found that in a survey of 2,000 RVers, 98 percent said the national parks facilities need to be upgraded. RVers in the survey expressed a desire for longer and wider campsites, improvement of the day-to-day upkeep of campgrounds, and more RV campsites, RVIA said.
RVIA correlates the state of disrepair of national parks and a drop in national park overnights—from over 4 million annually in the 1980s to 2.5 million now, despite increases in RV ownership. Overnights in state parks and privately run parks continue to increase, it noted.
Public-Private Partnerships
Is the entry of private businesses into park operations the answer? RVIA thinks so.
Watson already had suggested that some parks should be franchised to private operators.
In its survey of RVers, RVIA said, 85 percent expressed support for the idea of public-private partnerships to accomplish repairs and improvements. Partnerships could improve not only campsites, but also roads and bridges, making the campsites safer, RVIA says. It also suggested that better connectivity for cell phones and Internet would improve visitors’ access to weather information and emergency services when needed.
RVIA’s position is that National Park Service input on fees would keep rates affordable. But the whole premise of its support for private partnerships in national parks is that private companies would solve the need for money, then recoup their investments over time through fees. How high fees would have to be to satisfy investors’ needs is a guess.
In the meantime, if you want to let your representatives in Congress know how you feel, you can find email addresses online for members of the House and Senate.
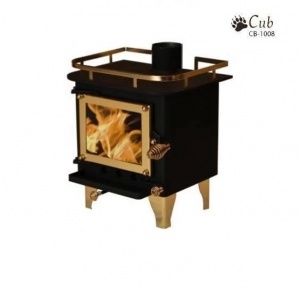
Guide to Wood-Burning Stoves for RVs
If you miss curling up by the fire on a cold fall or winter’s evening because you’re on the road in your RV, you may want to look into real wood-burning stoves for RVs.
These compact units, in addition to lending a rustic appeal, supply all the heat most RVs would need on cold nights—or days.
Having a wood-burning stove in a RV requires certain things:
- Enough space
- Proper insulation against intense heat on the nearby walls, floors and ceilings
- Proper exhaust to prevent carbon dioxide from building up inside the RV
- Usually a separate pipe for air intake
Wood Heat Pros/Cons
Wood heat has its advantages:
- BTU output is high.
- Wood heat smells great—especially with one cherry log on the fire.
- Firewood is cheap—particularly if you have access to a wooded lot of your own or a friend’s.
- A stove with a big enough top surface can be used for cooking.
- Wood heat tends to be dry, reducing condensation on interior surfaces.
Wood heat also has disadvantages:
- You’ll need to cut wood into pieces that fit, no more than 6 or 8 inches on some small units.
- Fires may not burn through the night, so you may have to wake up to add fuel.
- There’s ash to clean out and dispose of.
- Flue pipes and the stove must be cleaned periodically.
- If you have a stealth van or converted truck camper, the flue pipe will give away your vehicle’s true identity.
- You will have to cut a hole in the roof of your RV for the flue pipe, and fit a kit that lets you remove the tall pipe and seal the opening when on the road.
- Back to that dry air. You may want to humidify a bit with a pan or kettle of water on the stove.
Wood Heat Works
Among people who convert other vehicles into RVs—school buses and cargo trailers, for example—wood heat has proven to be viable, effective and safe. It works in a commercially made RV as well if you have the space.
All wood stoves must have a clearance area for walls, ceilings, floors and furniture. Propane heaters have clearance requirements, too, but those for wood stoves typically are larger.
You’ll need to buy and install a surface-protection kit that has fire-resistant surfaces and insulation to prevent the intense heat of the wood stove from migrating to wall surfaces, ceilings and floors. Alternatively you can make barriers out of non-flammable materials.
If your stove is mounted off the floor, you may have storage space underneath. High mounting also eases loading and cleaning.
Appearance
RV woodstoves typically are painted with black heat-resistant enamels. Some offer bright metal trim, such as on the window surround on the door, or on other stove details. Stainless steel models are bright.
To see the flames you’ll need a stove door with a window. The windows are ceramic to provide a view and hold up to the intense heat. If watching the fire isn’t important, a metal door may save a few bucks.
Fuel
Hardwood makes the best fuel. It burns longer and cleaner, so it won’t coat the chimney with creosote as quickly or as thoroughly as softwoods do. Creosote is a fire hazard, so periodic cleaning is required. When you install a stove, check the cool pipe weekly for creosote buildup. When you spot a buildup, clean the pipe, then repeat the cleaning in about as many weeks as the first buildup took.
Stoves also burn pressed composite fire logs. Keep some on hand for emergencies when your firewood supply is exhausted.
Some stoves also burn coal, but be warned: Coal dust is heavy, unpleasant to deal with and can fly with the slightest disturbance, including cleanouts.
Store firewood in a sealable plastic bin or bins. A lid ensures that any insects inside the wood won’t get into your RV.
Woodstoves that are EPA certified burn clean.
Size Matters—Sometimes
RV-adaptable woodstoves are quite compact. Generally speaking, the bigger the stove, the higher the heat output. But woodstoves pack a punch, and you might be surprised at how much space a modestly sized stove can heat.
The Dickinson Marine 00-NEWSF Newport Solid Fuel Heater is extremely compact at 10x8 inches, with a height of 17 inches. It weighs just 15 pounds. It can burn one or two small logs, a composite log, charcoal briquettes or coal for a modest output of 3,000 to 8,000 BTU, enough for a small camper, or for a van, truck or cargo trailer conversion. There is no glass window for viewing flames. About $425. Caution: Do not confuse this with similar-looking Dickinson propane models if you intend to burn wood or coal.
The Cubic Mini Cub measures less than 1 cubic foot and weighs just 27 pounds —surprisingly light for a wood-burning steel stove. Its 6,000 to 14,000 BTU output is best for RVs of less than 200 square feet, so you could use one in an 8x20 travel trailer if you’re willing to burn the stove hotter and tend it more often. These are ideal for space-challenged RVs. About $900 with all you need: stove, wall and floor protection, plus chimney with air intake.
The Summers Heat 1,200 square-foot Woodstove is bigger but still compact at 21x15 inches, with a 32-inch height on its steel legs. A built-in fan more evenly distributes heat. Burning typical 16-inch logs, it can put out up to 60,000 BTUs of heat, more than you would need for even a large RV. About $650.
For a long, unattended burn, consider the Kimberly Mini Wood Stove, but be prepared to pay for your uninterrupted sleep. The price nears $4,000. The Kimberly uses less fuel and produces nearly smoke-free exhaust because it’s highly efficient. The 10-inch cylindrical stove has a 12–inch diameter base and is 27 inches high. It needs just 6 inches of clearance without wall protection. It can heat from 150 to 1,500 square feet on up to 40,000 BTU of output. There’s a small viewing window. The Kimberly weighs just 56 pounds.
Photo Credit: CubicMiniWoodstioves.com
Preventing Top RV Accident Causes

If you look at the Federal Motor Carrier Safety Administration’s leading causes of RV accidents, most are avoidable.
Some have to do with driver error while operating a motorhome or towing a trailer or fifth wheel, and some with human error before heading out on the road.
Here are some safety tips that could help eliminate these causes.
Don’t Drive When You’re Tired
It’s so simple it seems almost silly to even list it, but overly tired drivers are a leading cause of RV accidents, according to a 2012 study by the agency.
To avoid adding to that toll, do some really simple things:
- Get enough sleep. Simple, right?
- Plan your trip realistically. Trying to meet unrealistic distance or time expectations may make you weary.
- Be honest about how tired driving makes you, and the effects on you from the number of hours you’re on the road, traffic conditions, wind and weather, dealing with mechanical troubles, or the stress from not being able to find a dump station or fresh water.
- If you’re a couple, make sure both can drive in shifts.
- Nap if you’re tired, then get back on the road, or just stop early for the night.
Load Your Rig Properly
Carrying more than your rig’s payload capacity can cause an imbalance. Overweight trailers and improperly loaded trailers are both among leading RV accident causes.
Have your rig weighed on a scale that shows the weight on each wheel. That way, even if you’re not overweight, you can at least distribute the weight evenly. If you’re consistently overweight, do a cleanout. Make three piles: leave at home, discard and donate. Then reload your RV with fewer things and better weight distribution.
Leave enough time to dump tanks so they’re empty when you travel. Traveling with 100 gallons of fresh water and waste adds more than 800 pounds. That may approach half your maximum recommended payload on a modestly sized RV.
Use a Weight Distribution Hitch and Anti-Sway Bar
Rollovers stemming from an RV’s higher center of gravity are another leading accident trigger. Many drivers don’t account for the different weight characteristics of an RV, especially travel trailers. They are either unaccustomed to the top-heavy RV or unprepared to deal with the behavior it exhibits at speed and in crosswinds.
Use a weight-distribution hitch and anti-sway bar. The hitch shifts weight toward the front axle of a tow vehicle. The anti-sway bar discourages the back-and-forth motion that is a notorious prelude to a trailer’s overturning.
Also helpful is a brake controller with an instrument panel-mounted controller that lets you apply the trailer brakes only if you feel or see sway coming on.
Eliminate Blind Spots
Failing to see vehicles overtaking you through blind spots is another top accident cause, according to FMCSA. Install an aftermarket system if your motorhome lacks blind spot monitoring. You can also install one on your trailer or fifth wheel, with a backup camera that doubles as a rear view mirror.
If you’re towing a trailer with a truck that lacks towing mirrors, add them. You can do it inexpensively with oversized clip-on mirrors that attach without tools to your truck’s smaller mirrors. The clip-on mirrors extend far enough from the truck body to give you a clear view of approaching vehicles.
Slow Down
Speeding is another major cause of RV accidents with a simple solution: Drive slower, especially in foul weather, strong winds, and heavy traffic, and on poor road surfaces. High winds, another frequent accident generator, affect an RV more the faster you drive. Sometimes the best way to prevent speeding is to plan your trip well, leaving enough time to reach destinations without having to hurry.
Failing to stop in time, also a major cause of RV crashes, is closely related. Keep a safe distance from vehicles in front of you and travel at a speed that’s appropriate for the gap between you and that vehicle. Remember: A motorhome or RV-towing pickup needs a longer distance to stop safely than a smaller vehicle you may drive daily.
Check Your Hitch, Then Check Again
Runaway trailers also make the list.
Make sure your hitch is seated properly on the ball before locking it up. Cross your safety chains. And make sure the tether that triggers the trailer brakes in a breakaway is not too long—typically no more than 16 to 20 inches. Longer cables delay application of trailer brakes if the hitch becomes disconnected. Check to make sure every latch, pin, lever and chain is properly in place and tightened.
Never Too Late To Learn
If you change RVs, especially if you move up to a Class A or a much longer trailer or fifth wheel, consider taking a driver instruction course, even if you had taken one years earlier. Bigger size changes many factors, including weight, turning radius, handling and stopping distance. You also will benefit from instruction in the many new technologies in today’s RVs.
Mistakes by senior drivers are among the leading causes of RV accidents, the motor carrier association says. If you’re an older RVer, your experience is invaluable, but think about taking a refresher RV driving course.
Photo Credits: flickr.com/JoonasTikkanen
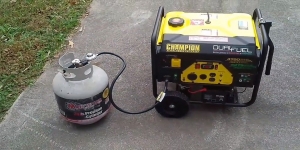
Portable RV Generators Are a Hot Item!
It may seem sacrilegious to some RVers not to have an onboard, integrated generator, but there are several reasons portable RV generator sales are up:
- Many new RVs that are smaller, lighter and cheaper simply don’t have a built-in generator.
- Portable generators are becoming more feature-filled, powerful, efficient, reliable and durable.
- Many portable generators are surprisingly quiet, even without being inside a compartment on the RV, because they have their own sound insulation.
- Portables are cheaper.
- Built-in inverters make portables good not only for recharging battery banks, but also for running such things as air-conditioners and computers.
- RVers who prefer boondocking—dispersed camping away from RV parks, without hookups—or do a fair amount of it are relying more on solar arrays to keep their house batteries charged, so a portable suffices as a supplemental power source.
- Some portables have dual-fuel capability, running on gasoline or propane.
RV-Ready
More generators are billed as RV-ready, but what does that mean? As with so many things in the RV universe, there’s no legal definition of the term “RV ready,” so shop carefully.
Some makers say a generator is RV ready if it has a TT-30 twist-type outlet like the one you would find on an RV park’s 30-amp shore-power hookup. It lets you more easily feed your RV’s electrical system directly from the generator, but you can also do it with a quality adaptor. The problem is that many of these generators are really just contractor-grade tube-framed AC units that are noisy and inefficient.
Think about what makes a generator attractive for your campsite: quiet operation, low weight, a decent run time on one tank of gasoline, the capability to generate DC current, and a built-in inverter. A quiet generator is really one that has a decibel level in the 50s at 23 feet. Remember: It’s not just about your ears, but also about those of your neighbors.
Briefcase-style generators, with a handle on top and sound insulation surrounding the engine and alternator, are the quietest. These inverter-equipped models produce direct current—DC power—and use the inverter to turn it into 110v of alternating current, or AC, which is what you get from shore power.
Two more features are useful. The first is electric start. These generators have an internal battery to turn a starter motor. There’s a pull cord for backup. The second is a sensor that shuts the generator down if the oil level is low. This feature could save your generator if you’re lax about checking the oil regularly.
How Much Power?
In general, the higher the power rating, the more expensive the generator is, at least within a single brand. Some brands carry a premium and may cost more for a unit that generates lower output than for a competing brand that produces higher output. Honda and Yamaha, both having reputations for quality, clean power, low noise and durability, are likely to cost more than competitors for equal power ratings—and they’ll sell at list price or close to it.
If you’re running an air conditioner, or lots of power-sucking devices simultaneously, such as a hairdryer, computer and a coffee maker, you may want to go with 3,000 watts or more. A 2,000-watt generator should suffice to run a small air-conditioner, but not multiple devices with it.
A top-of-the-line 2,000-watt generator, such as the Honda EU2200i, costs a bit over $1,000. Some inverter-equipped competitors cost $300 to $400 less. Check the reviews online.
A 3,000-watt Honda gasoline-powered inverter generator, the EU3000i, costs about $2,100. You can pick up a 3,000-watt Champion for about $860. You have to decide if a premium brand is worth the price.
Almost all generators have an economy mode to save fuel. Read or watch reviews to determine if the wattage of a generator can run what you want in economy mode. On many models, the generator switches automatically from economy mode to full power when it senses a heavy load, then back down to economy when the load lightens.
Dual-Fuel Generators
A dual-fuel generator, which runs on gasoline or propane, has its advantages. For one thing, if you run it on propane, you don’t have to carry gasoline in a jerrycan—not the safest proposition. Yes, you’ll have to get propane more often, but trading in a tank of propane or having one filled can be a lot neater and easier than having to get and transport gasoline. Generators fired by propane also tend to run a bit quieter, which you may prefer.
The downside of propane: It’s less efficient. You’ll get fewer hours of operation out of a gallon of propane than out of a gallon of gasoline, although propane is at least a bit cheaper. If you think the noise level and convenience of propane refills are worth the tradeoff, a dual-fuel unit may be for you. You can hook a propane line directly from your RV tanks to a dual-fuel generator, or you can carry an extra propane tank—in your pickup truck bed, if you tow—to handle the generator.
Prices on dual-fuel generators, all other things being equal, are less than 20 percent higher. For example, a 3,400-watt sound-insulated Champion RV generator that uses only gasoline costs around $860. A dual-fuel version with the same wattage is less than $1,100.
Rodent Problems in Your Motorhome?

Rats! Something is chewing the wiring on RVs, tow vehicles and dinghies!
Yes, rats, quite literally—or more likely mice, and maybe squirrels, rabbits or groundhogs.
The wire-chewing problem appears to have reached epidemic proportions. Ask any insurance agent and you’ll hear that claims for chewed wiring are rising. Online reports of damage are widespread. One woman complained to the National Highway Traffic Safety Administration that when she turned on her car’s air conditioner, mouse fragments rattled around the box fan and flew everywhere through the vents, including all over her. One Toyota Tundra owner has sued Toyota over repeat episodes of rodent damage to under-hood components.
Comprehensive insurance usually covers the damage, but owners are left covering deductibles that can reach $1,000 or more, depending on the policy, and they lose the use of their vehicles until repairs are completed.
A Matter of Taste
Rodent damage is nothing new, of course. Mice have always found a way to squeeze through the tiniest opening—or chew their way through anything but stainless steel—to reach any food not placed in a sealed container.
But that was all kinds of food. What has made rodent tastes go from eclectic to electric? Why have vehicles become all-you-can-eat buffets for rodents?
They’re attracted by the new coatings on automotive wiring. Once protected by a rubber-based product, and then by petroleum-based plastics, the wires are now increasingly encased in a more environmentally friendly soy-based sheathing.
And rodents love it. To them, it’s food. Automotive wiring manufacturers might as well have posted blinking neon signs in driveways and campsites that say “Mouse Diner This Exit.”
What Can You Do?
Short of poison, it is possible to keep rodents from wiring, but it’s not always easy.
Avoid resorting to poison. It can work, but it presents dangers to people and pets. The rodent doesn’t die where it eats the poison, but instead where it is when the poison takes effect. That could be inside a wall or air duct, where the odor can linger for weeks. In ductwork, it will not only smell, but also can spread the poison through air conditioning and heating.
If a pet eats a poisoned rodent—lying in a corner of your coach or on the ground outside—the pet is poisoned, too.
It’s a better practice to keep rodents away from the wiring.
Here are some things that can help:
- Have metal screening installed around wiring under the hood of vehicles, and over vent openings. Screen is cheap, but the labor to install it may run into hundreds of dollars.
- Wrap wires with an electrical tape that repels rodents. Honda 4019-2317 electrical tape is infused with capsaicin, a hot spice that will convince a mouse to dine elsewhere. You can install it yourself when the engine is turned off and cool.
- Spray wires with a rodent repellent, such as Rodent Defense or Natural Armor Vehicle and Engine Protection. They don’t kill rodents, just ward them off.
- Mouse Free is a spray applied to the underside of any vehicle with a compressed air sprayer before and after winter storage. It contains natural oils, including peppermint, which rodents hate. It’s not cheap, costing a bit over $100 for a gallon and sprayer. Refills are around $35.
- To catch mice, set snap traps around tires when your RV, tow vehicle and dinghy are parked. You’ll need three traps per wheel—one in front, one in back and one on top. That means 12 to 18 for a tow vehicle or motorhome, six to 12 for a travel trailer and 6 more for your dinghy.
- Plug any holes in your RV, preferably with steel wool, which mice can’t chew.
Handling Motorhome Tire Blowouts
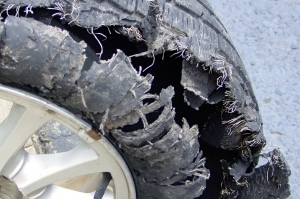
If you’re an RV owner who experiences a tire blowout at highway speed, it probably scared you about as much as anything in your life. Even experienced drivers fear the sudden loss of pressure in a tire because of the vehicle control it takes away.
It is possible, however, to control a vehicle when a tire blows—even at speed—if you know what to do. Ironically, doing what you think is right is not always the answer.
How Do Blowouts Occur?
Blowouts aren’t nearly as common today as years ago when tires had tubes. In those days, once the inner tube was breached, pressure loss was immediate and critical—often deadly.
Tubeless tires blow out less often, but it still happens. So do garden-variety flat tires, which remain hazardous, especially on highways with high speed limits and heavy traffic. According to the National Highway Traffic Safety Administration, tire-related problems, including flats and blowouts, caused 738 fatal accidents in 2017, the latest statistic available.
Blowouts occur because of sudden tire failure, sometimes from factors that build up over time. That can be over months, hours or, unfortunately, minutes. Resulting problems can be ply separations, tread disintegration, sidewall fatigue, failure of the bladder (which holds air in the tire), or leaks in the valve or valve stem.
When a Tire Blows at Speed
The best thing to do when a tire fails while you’re driving an RV is counterintuitive. It’s all about physics—about real science, not gut feelings. Don’t hit the brakes or immediately slow down, reactions that many people believe are best. Instead, press the accelerator to maintain or, if possible, increase speed.
A flat tire will slow your RV, but with somewhat erratic control as it exerts a force to whatever side has the flat. So, for example, if a right tire blows—either front or rear—you’ll feel a pull to the right. You’ll sense a rear-tire failure in your seat; you’ll feel a front-tire failure in a stammering message from your steering wheel.
A study done by leading tire maker Michelin for the Recreational Vehicle Industry Association with a lesson placed on video shows that accelerating allows the forward force of the RV to better overcome the sideways force. You’ll have to make a lot of steering corrections to maintain control—you’ll really wrestle with the wheel. Once you reach a safe place to pull over, signal and gradually slow and steer to the side of the road. There, you can change the tire yourself or call for a service truck.
How To Avoid Blowouts
It’s best to avoid blowouts in the first place. The leading causes of blowouts are overloads and under inflation. Don’t overload your RV. Don’t underinflate your tires—or overinflate, either.
There’s no guarantee that you’ll never experience a blowout, but doing these things will help to avoid one:
- Buy quality tires. Search online for reviews of any tire brand and model you’re considering. Make sure it’s a real review, not just praise trumped up by a tire dealer trying to make a sale. Also check the NHTSA for recalls and complaints.
- Look at ply ratings. Most tires have two or three sidewall plies, but those for heavier vehicles and trailers have higher ply ratings indicating more sidewall strength. Load Range B is merely two plies and impractical for trailers, tow vehicles or motorhomes. Load Range C is a 4-ply rating and still often inadequate for the stresses of heavy loads. Better are Load Range D (6 ply-rating), E (8-ply rating) or F (10-ply rating).
- Make sure your tires are rated for proper load. Consult a standard load table. Check your load per axle on a truck scale. Evenly distribute weight as much as possible. And remember: Full tanks add hundreds of pounds to your load.
- Check your tire pressure before a trip—and every morning.
- Inflate to the manufacturer’s recommended pressure. Remember that driving in high altitudes may require extra air, since pressure in the tire will drop as you climb.
- Maintain your tires. Rotate them at least annually, or every six months. Maintain proper pressure. Make sure tires are balanced.
- When you’re parked, use covers to shield tires from degradation caused by the sun’s UV rays, especially in the Sun Belt.
Take your time, particularly if you’re not overly experienced at driving or towing an RV. If you’re going a little slower when a tire blows—55 or 60 mph instead of 75—reacting to it will be easier. And keep a longer distance between you and the vehicle ahead of you, which gives you an opportunity to accelerate in the event of a blowout.
Photo Credits: Flickr.com